Introduction
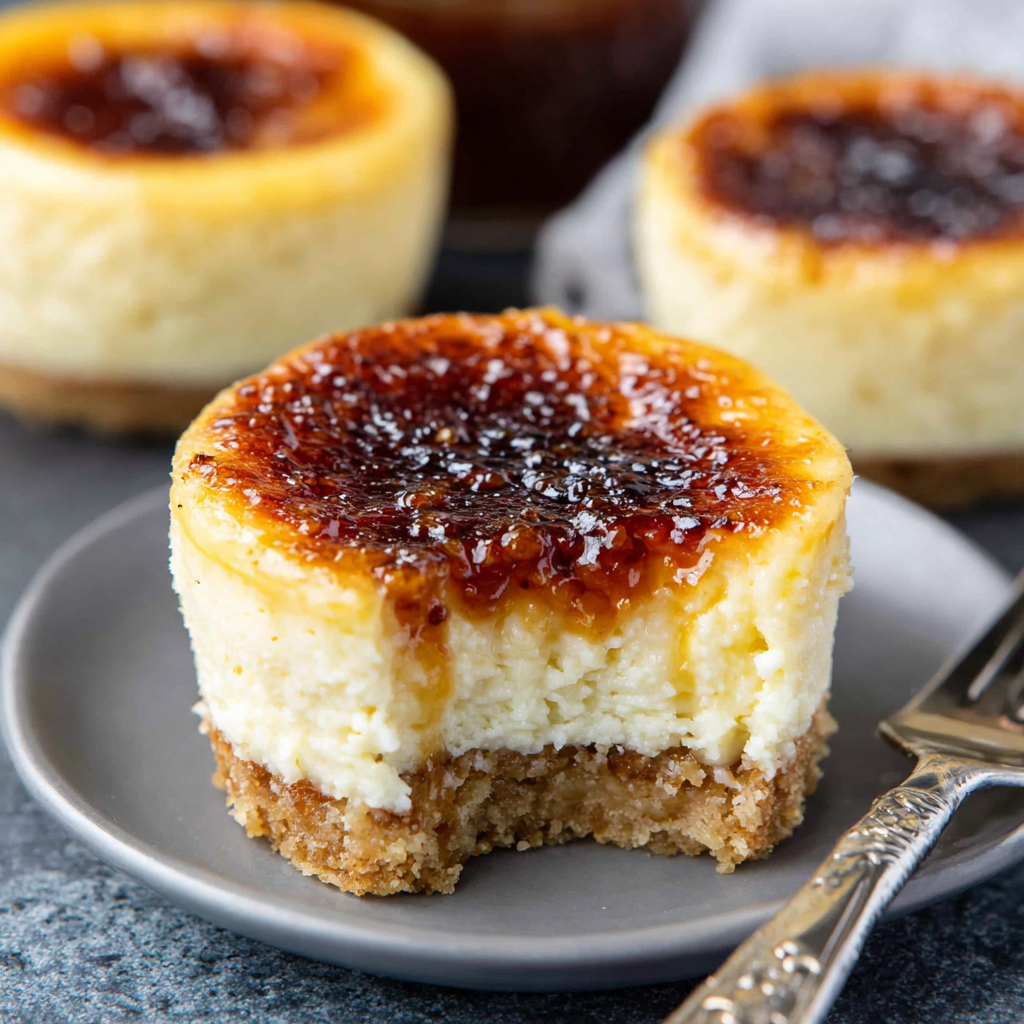
Mini Crème Brûlée Cheesecakes are a delightful twist on two classic desserts. With their creamy texture, rich flavor, and a perfectly caramelized sugar top, these charming bites offer a little bit of everything that's wonderful about cheesecake and crème brûlée.
Ideal for gatherings or as a special treat at home, these mini cheesecakes provide an elegant presentation that impresses without requiring extensive pastry skills. They're easy to make, and their individual portions make them perfect for sharing.
Ingredients
- 1 cup graham cracker crumbs
The base for these cheesecakes, graham cracker crumbs give a sweet and slightly crunchy contrast to the smooth filling. Their subtle, buttery flavor sets the stage for the rich tastes that follow. - 1/4 cup granulated sugar
Sugar not only sweetens the crust but also enhances the overall flavor profile of the dessert. Its measured amount is enough to create a delicate sweetness without overshadowing the richness of the cheesecake. - 1/2 cup unsalted butter, melted
Butter binds the graham cracker crumbs and adds richness to the crust. Using unsalted butter allows you to control the overall saltiness of the dessert while providing a lush texture. - 16 ounces cream cheese, softened
Cream cheese is the star of the cheesecake filling, contributing creamy texture and a tangy flavor that balances the sweetness. Room temperature cream cheese combines more easily for a smooth mixture. - 1/2 cup sour cream
Sour cream adds a layer of tanginess and moisture to the filling, creating a luscious texture. It enhances the cream cheese flavor while keeping the cheesecakes from being too dense. - 1/2 cup granulated sugar
This sugar sweetens the cheesecake filling, striking a balance with the tangy flavors of cream cheese and sour cream. It's crucial for achieving a well-rounded dessert that’s satisfying yet not overly sweet. - 2 large eggs
Eggs help set the cheesecake during baking, providing structure and stability to the filling. They contribute to the creaminess and richness, blending seamlessly with other ingredients. - 1 teaspoon vanilla extract
Vanilla extract infuses the filling with warmth and depth of flavor. Its aromatic notes complement the rich dairy elements beautifully, elevating the overall dessert experience. - 1/4 cup granulated sugar (for topping)
This additional sugar is used for the signature brûlée topping. When caramelized, it forms a crunchy, sweet contrast to the creamy cheesecakes and adds a delightful texture.
Directions & Preparation
Step 1: Preheat the oven to 325°F (160°C).
Preheating the oven ensures even baking from the moment your cheesecakes go in, which is crucial for achieving the right texture. A properly heated oven helps prevent the cheesecakes from cooking unevenly or cracking.
Step 2: Prepare a muffin tin by lining it with cupcake liners.
Using cupcake liners makes for easy removal of the mini cheesecakes and helps maintain their shape. Additionally, the liners add a decorative touch to the presentation, making it easier to serve them at gatherings.
Step 3: Combine graham cracker crumbs, sugar, and melted butter in a bowl.
These ingredients form the crust. By mixing them together thoroughly, you ensure the crust binds well and holds its shape while providing that pleasant, crunchy texture. Make sure the mixture resembles wet sand for optimal adhesion.
Step 4: Press the crumb mixture into the bottoms of the lined muffin cups.
This step is critical for establishing a firm base for the cheesecakes. Pressing down firmly but gently with a measuring cup or your fingers helps to compact the crumbs, ensuring they hold together during baking and serving.
Step 5: In a mixing bowl, beat the softened cream cheese until smooth.
A smooth texture is essential for the filling. Beating the cream cheese allows any lumps to dissolve, ensuring that the final cheesecake is creamy and uniform. This step is important for avoiding a grainy texture in the finished product.
Step 6: Add sour cream and sugar to the cream cheese, mixing until combined.
Incorporating the sour cream and sugar at this stage balances flavors and adds creaminess. Mixing until combined is necessary to achieve an even flavor distribution, which contributes to the overall enjoyment of the cheesecake.
Step 7: Add eggs one at a time, beating well after each addition.
Adding the eggs individually allows for better incorporation into the mixture. Each egg helps to create a structure that holds the cheesecake layers together while maintaining a rich, smooth filling.
Step 8: Mix in vanilla extract for flavor.
Vanilla is key in elevating the overall flavor profile of the cheesecake. Its sweet and aromatic notes complement the cheesecakes without dominating, enhancing the dessert's luxurious character.
Step 9: Pour the cheesecake filling over the prepared crusts.
Carefully pouring the filling allows it to settle evenly over the crust, creating layers that are pleasing to the eye. Ensuring the filling is level helps with even baking and presentation once cooled.
Step 10: Bake in the preheated oven for 20–25 minutes.
Baking the cheesecakes until they are set but still slightly jiggly in the center is crucial for achieving the right texture. Overbaking can lead to dry cheesecakes, so monitor closely towards the end of the baking time.
Step 11: Remove from the oven and let cool to room temperature.
Allowing the cheesecakes to cool gradually helps to reduce the risk of cracking. As they cool, they will continue to firm up, reaching their ideal texture for serving. Patience here pays off beautifully.
Step 12: Refrigerate for at least 2 hours before serving.
Chilling the cheesecakes allows the flavors to meld and the textures to settle. This step enhances the creamy feel and sweetness, offering a more enjoyable taste upon serving. It’s the perfect time to think about the brûlée topping!
Step 13: Before serving, sprinkle an even layer of sugar on top of each cheesecake.
Creating a topping of sugar ready for caramelizing is essential for that signature crème brûlée finish. Ensuring an even layer helps achieve consistent crystallization when caramelized, resulting in a perfect burnt sugar top.
Step 14: Use a kitchen torch to caramelize the sugar until golden brown.
Caramelizing the sugar brings a delightful crunch and creates that sought-after contrast of textures. A kitchen torch allows for precise control, but a broiler can work too, with close supervision to avoid burning.
Step 15: Allow the sugar to cool for a minute before serving.
Allowing the caramelized top to harden slightly before serving ensures that each bite features that satisfying crack of burnt sugar. This tiny moment of waiting elevates the overall experience of indulging in these cheesecakes.

Creating the Perfect Crust
The crust sets the foundation for the mini cheesecakes, so achieving the right texture is vital. Combining graham cracker crumbs with butter in the right proportions makes a crunchy yet cohesive base. Pressing firmly ensures it cooks evenly, providing a satisfying crunch with every bite.
Mastering the Cheesecake Filling
The success of your mini cheesecakes largely depends on the filling. Achieving a smooth, lump-free texture through proper mixing techniques is essential. Remember that room temperature ingredients blend more easily, ensuring a creamy consistency that’s perfect for these delightful desserts.
Brûlée Topping Techniques
The characteristic caramelized sugar topping is what makes these mini cheesecakes so alluring. Using a kitchen torch allows for precise control when caramelizing sugar, ensuring even results. Just remember to be patient, as you await the delightful transformation from granulated sugar to a satisfying crisp finish.
FAQs
What if the cheesecake filling seems too thin?
If the filling feels thin, ensure it is well blended without lumps. If still questionable, you can add an extra egg, as this will help firm up the texture during baking.
How can I avoid cracks on the top of my mini cheesecakes?
To prevent cracking, avoid overbaking and allow the cheesecakes to cool gradually. A water bath during baking can also help maintain moisture and even temperature, reducing the likelihood of cracks.
Can I use a different type of cookie for the crust?
Absolutely! You can substitute the graham cracker crumbs with crushed digestive biscuits or Oreo cookies for a unique flavor and texture. Just make sure to adjust the sugar if the cookie base is sweetened.
What do I do if my sugar doesn't caramelize properly?
If the sugar isn't caramelizing correctly, ensure that you're using granulated sugar and that your torch is at the right distance. Hold the flame about 2 inches from the surface and move it in a circular motion to evenly caramelize.
Can I adjust the sweetness of the filling?
Yes, you can modify the amount of sugar in the filling to suit your taste. Just be cautious not to alter it too much, as this might impact the texture and consistency.
What if my mini cheesecakes are too dense?
If your cheesecakes turn out too dense, it's possible that they were overmixed or overbaked. In future attempts, mix just until smooth and ensure that they are removed from the oven while slightly jiggly in the center.
Conclusion
These Mini Crème Brûlée Cheesecakes bring an extraordinary blend of flavors and textures that are sure to impress. Their easy preparation and delightful presentation make them a perfect choice for entertaining or a special treat.
As you enjoy these charming layered desserts, remember that every shiny, caramelized topping hides a world of creamy delight beneath. Perfect for any occasion, they remind us that indulgence can also come in small packages.
Recipe Card
Notes
Additional serving suggestions: pair with a crisp salad, garlic bread, or roasted seasonal vegetables for balance.
For make-ahead, prep components separately and assemble just before heating to preserve texture.
Taste and adjust with acid (lemon/vinegar) and salt right at the end to wake up flavors.


