Introduction
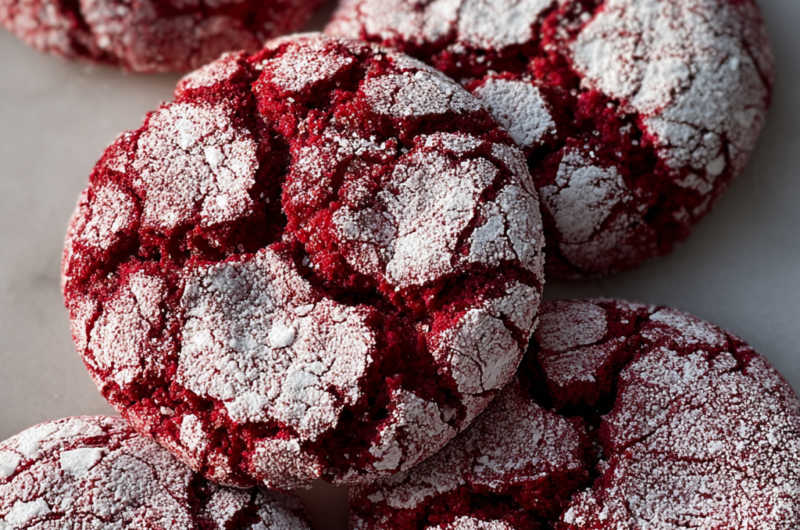
Red Velvet Crinkle Cookies are a delightful twist on the classic red velvet cake, offering a sweet treat that combines texture and flavor in the best possible way. These cookies stand out not only for their rich crimson hue but also for their powdery exterior that gives way to a chewy center. Perfect for holidays, gatherings, or any occasion, they are sure to impress family and friends alike.
As you prepare to bake these cookies, let the vibrant color and unique flavor profile inspire your culinary adventure. With the classic taste of cocoa and a hint of vanilla, the cookies are both visually stunning and mouthwateringly indulgent. Whether you share them or keep them all to yourself, Red Velvet Crinkle Cookies promise to bring joy to each bite.
Ingredients
- 2 cups all-purpose flour
Forms the base of the cookies, providing structure and stability. Choosing the right flour helps achieve the desired texture so the cookies are chewy on the inside and slightly crisp on the outside. - 1/2 cup unsweetened cocoa powder
Adds richness and depth of flavor to the cookies while contributing to their signature red velvet taste. Cocoa powder also works in tandem with the baking soda to enhance the overall rise. - 1 teaspoon baking soda
Acts as a leavening agent, helping the cookies rise and achieve that desired fluffy texture. Proper measurement is essential to get the right lift without over-expanding. - 1/2 teaspoon salt
Enhances the sweetness and balances the flavors. A careful amount will prevent the cookies from tasting flat, making every bite pop. - 1/2 cup unsalted butter
Provides moisture and richness to the dough, contributing to the soft, chewy texture of the cookies. Be sure to use unsalted butter to have better control over the salt content. - 1 cup granulated sugar
Sweetens the cookies and helps build a light texture. The creaming process with butter is crucial, as it incorporates air for better expansion during baking. - 1/2 cup brown sugar
Adds additional moisture and a slight caramel flavor that pairs beautifully with the red velvet profile. The molasses in brown sugar also contributes to the cookie's chewiness. - 2 large eggs
Bind the ingredients together and provide moisture, creating a cohesive dough. Eggs also help with the structure of the cookies, allowing them to hold shape while baking. - 2 teaspoons vanilla extract
Infuses a warm flavor that complements the cocoa and red velvet character. It rounds out the taste profile and enhances the overall sweetness. - 1 tablespoon red food coloring
Gives the cookies their signature vibrant red hue. Using gel food coloring can produce a more intense color without altering the cookie dough's consistency. - Powdered sugar for dusting
Creates the beautiful crinkle effect on the cookie's surface, adding an extra touch of sweetness while making them visually appealing.
Directions & Preparation
Step 1: Preheat the oven to 350°F (175°C).
Preheating the oven ensures even baking, which is essential for achieving the perfect texture. This allows the leavening agents to work effectively as soon as the cookie dough hits the heat.
Step 2: In a medium bowl, whisk together flour, cocoa powder, baking soda, and salt.
Sifting these dry ingredients together helps to evenly distribute the leavening agent and cocoa powder, preventing any clumping and ensuring a uniform texture in your cookies.
Step 3: In a large bowl, cream the butter, granulated sugar, and brown sugar until light and fluffy.
Creaming the butter and sugars incorporates air into the mixture, which is vital for the cookies’ rise. Aim for a pale color and fluffy texture to indicate this step is complete.
Step 4: Add the eggs, vanilla extract, and red food coloring, mixing until combined.
This stage adds moisture and binds the ingredients while transforming the mixture into a beautiful red batter. Don’t overmix; just combine until blended.
Step 5: Gradually stir in the dry ingredients until just combined.
Overmixing at this stage can lead to tough cookies, so mix gently until the flour is just incorporated into the wet ingredients, ensuring a soft texture in the final product.
Step 6: Chill the dough for 30 minutes in the refrigerator.
Chilling helps the fats firm up and makes the dough easier to scoop, which is essential for shaping the cookies. It can also enhance the flavors and result in a more defined crinkle.
Step 7: Scoop tablespoons of dough and roll them into balls, then roll each ball in powdered sugar until fully coated.
Coating the dough balls in powdered sugar not only creates the crinkle effect but also adds sweetness. Aim for a generous coating for the best visual and taste results.
Step 8: Place the dough balls on a baking sheet lined with parchment paper, spacing them 2 inches apart.
Proper spacing allows the cookies to expand without merging during baking. The parchment paper helps prevent sticking and makes cleanup a breeze.
Step 9: Bake for 10-12 minutes, until the edges are set but the centers are still soft.
It's crucial not to overbake these cookies; they will continue to cook slightly after removing from the oven. You want that chewy center for the ideal texture.
Step 10: Let the cookies cool on the baking sheet for a few minutes before transferring them to a wire rack to cool completely.
Cooling on the sheet allows the cookies to set up a bit, preventing breakage. Transferring them to a wire rack ensures even cooling, maintaining their perfect texture.

The Science Behind Red Velvet
Red velvet cake is often associated with rich flavors and moistness, primarily derived from the chemical reaction between cocoa and acidic ingredients like vinegar. This reaction not only gives the cake its distinguishable taste but also enhances its vibrant color. In cookie form, these elements combine to create a treat that is both eye-catching and delicious, making red velvet crinkle cookies a unique hybrid treat.
Achieving the Perfect Crinkle
The signature crinkle of red velvet crinkle cookies is achieved through a combination of proper dough preparation and the generous dusting of powdered sugar. When the cookies bake, the sugar coating melts and cracks, leading to that beautiful, textural contrast that you see on the surface. Moreover, chilling the dough before baking allows for more controlled spreading, contributing to the ideal appearance.
Customization Options for Delightful Variations
While red velvet crinkle cookies are delicious on their own, don’t hesitate to experiment with mix-ins. Consider adding white chocolate chips or chopped nuts for additional flavor and texture. You could also infuse the dough with spices like cinnamon for a warm, cozy twist that complements the cocoa beautifully, allowing these cookies to match any season or occasion.
FAQs
What can I do if my cookie dough is too thick?
If your dough is too thick, add a small amount of milk or water, one tablespoon at a time, until the desired consistency is reached. Alternatively, chilling it less can soften the dough.
Why did my cookies spread too much during baking?
Excessive spreading can occur if the dough was not chilled long enough or if the butter was too soft. Ensure proper chilling and start with cool butter.
How can I enhance the chocolate flavor in my cookies?
You can enhance the chocolate flavor by using high-quality cocoa powder. Additionally, consider adding chocolate chunks or chips to intensify the overall experience.
What should I do if I find the cookies too sweet?
If the cookies taste too sweet, consider reducing the sugar in your dough during your next bake. You could also balance it with more cocoa powder.
Can I use cake flour instead of all-purpose flour?
You can substitute cake flour, but reduce the amount slightly and expect a different texture—there will be more tenderness but potentially less chewiness.
What causes my cookies to be overly chewy?
Overmixing the dough or too much brown sugar can contribute to excessive chewiness. Ensure you mix just until combined and balance sugars.
Conclusion
Red Velvet Crinkle Cookies are more than just visually striking; they embody the delightful balance of flavor and texture that makes them a beloved treat. Whether enjoyed fresh out of the oven or shared with loved ones, they are sure to please any palate.
With a bit of practice, you'll find that these cookies become a staple in your baking repertoire. Embrace the joy of creating these delicious treats and savor every moment spent in the kitchen.
Recipe Card
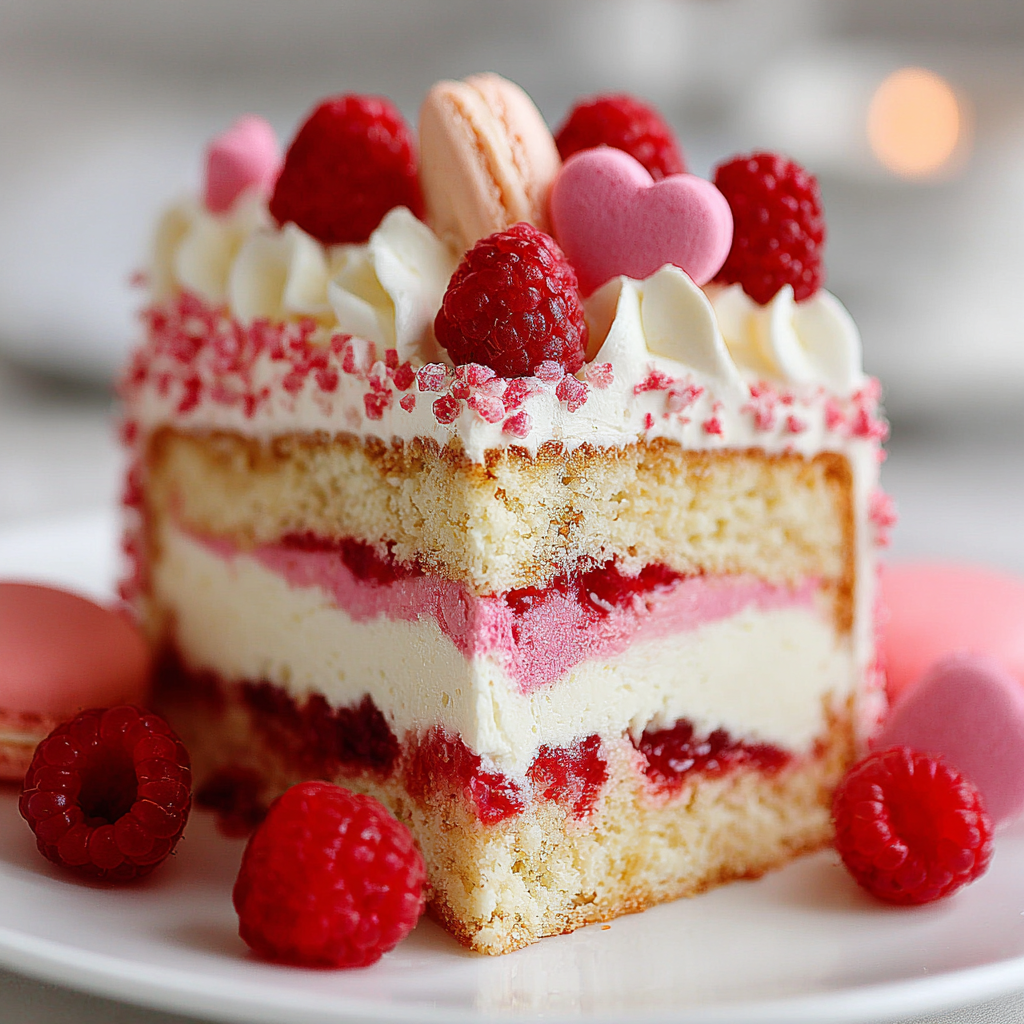
Romantic Treats: Your Delightful Valentine’s Day Cake
Ingredients
Method
- Preheat your oven to 350°F (175°C) and grease two 9-inch round cake pans.
- In a large mixing bowl, cream together the softened butter and granulated sugar until light and fluffy.
- Add eggs one at a time, mixing well after each addition, then stir in the vanilla extract.
- In a separate bowl, whisk together the all-purpose flour, baking powder, and salt.
- Gradually add the dry ingredients to the butter-sugar mixture, alternating with the buttermilk, and mix until just combined.
- Fold in the fresh raspberries gently to avoid breaking them.
- Divide the batter evenly between the prepared cake pans and smooth the tops.
- Bake in the preheated oven for 25-30 minutes, or until a toothpick inserted into the center comes out clean.
- Remove the cakes from the oven and allow them to cool in the pans for 10 minutes before transferring to a wire rack.
- Prepare the cream cheese frosting by beating together the softened cream cheese and butter until smooth.
- Gradually add powdered sugar and milk, mixing until you achieve a spreadable consistency.
- Place one cake layer on a serving plate, spread a layer of frosting, and top with the second layer.
- Frost the top and sides of the cake, using a spatula to create a desired texture.
- Garnish with extra raspberries or decorations of your choice before serving.
Notes
Additional serving suggestions: pair with a crisp salad, garlic bread, or roasted seasonal vegetables for balance.
For make-ahead, prep components separately and assemble just before heating to preserve texture.
Taste and adjust with acid (lemon/vinegar) and salt right at the end to wake up flavors.


