Introduction
As the holiday season approaches, there's a certain nostalgia that comes with tradition, and for many, the Little Debbie Christmas Tree Cake reigns supreme. These iconic treats, with their festive colors and delightful flavor, have long been a favorite, turning heads and tantalizing taste buds.
But what if we told you that you could indulge in that same festive flavor in a different form? Enter the Christmas Tree Cake Truffle, a delightful bite-sized treat that captures the essence of the original cake. Here’s how you can recreate this holiday favorite in your own kitchen.
Ingredients
- 1 box Little Debbie Christmas Tree Cakes (12 cakes)
These iconic cakes are the primary ingredient, providing the ideal mix of flavors and textures that mimic the original treat. Their festive blend of cake and icing eases the creation of a truffle-like consistency. - 8 oz cream cheese, softened
Cream cheese adds richness and creaminess to the truffle mixture. It binds the crushed cakes together while also giving a luscious texture that melds beautifully with the cake crumbs. - 1 cup white chocolate chips
Used for coating, white chocolate provides a sweet and creamy outer layer. It's essential for creating that signature look while complementing the sweetness of the cake. - 1 tbsp coconut oil
Coconut oil helps to thin the white chocolate, allowing it to coat the truffles smoothly. It also adds a subtle tropical flavor that pairs nicely with the other ingredients. - Sprinkles (for decoration)
Sprinkles not only enhance the visual appeal of the truffles but also add a festive, crunchy texture that contrasts with the creamy filling.
Directions & Preparation
Step 1: Prepare the truffle mixture by crumbling the Little Debbie cakes into a large bowl.
Begin by removing the Little Debbie Christmas Tree Cakes from their packaging and placing them in a large mixing bowl. Use your hands or a food processor to crumble them into fine pieces. This step is essential for ensuring that the truffles have a uniform texture; the smaller the pieces, the easier they will bind with the cream cheese.
Step 2: Add softened cream cheese to the crumbled cakes and mix until combined.
Once the cakes are crumbled, add the softened cream cheese to the bowl. Use a spatula or your hands to combine thoroughly. This mixture should be smooth and cohesive yet not overly wet. The cream cheese plays a vital role here, as it will provide moisture and help the cake crumbs adhere together, creating that truffle-like filling.
Step 3: Chill the mixture in the refrigerator for about 30 minutes.
Chilling the mixture allows it to firm up, making it easier to scoop and roll into balls. This step is essential for achieving perfectly round truffles that hold their shape when coated. If you skip this step, the mixture may be too soft and difficult to work with.
Step 4: Scoop out portions of the mixture and roll them into balls.
Use a small cookie scoop or your hands to portion out the chilled mixture. Roll each portion into a tight ball, about 1 inch in diameter. This ensures that each truffle has a consistent size and shape, leading to an appealing final presentation.
Step 5: Melt the white chocolate chips with coconut oil until smooth.
In a microwave-safe bowl, combine the white chocolate chips and coconut oil. Heat in short intervals, stirring in between, until melted and smooth. This mixture will serve as the coating for your truffles, so it’s crucial to achieve a smooth consistency for easy dipping.
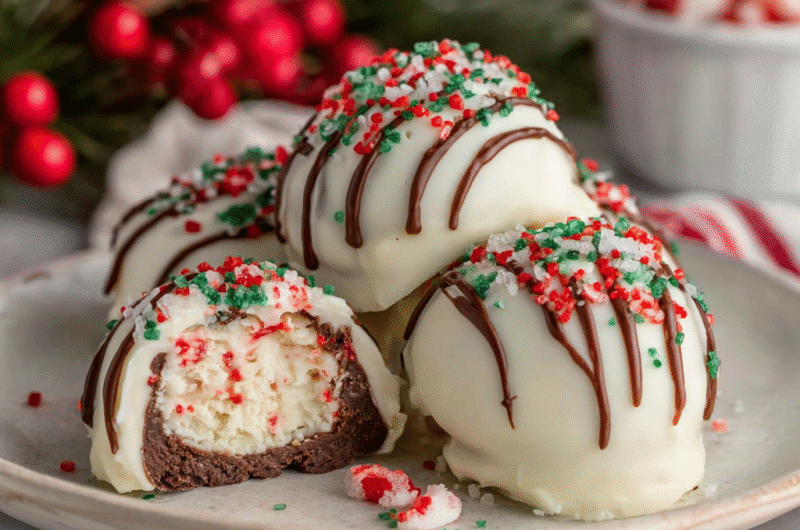
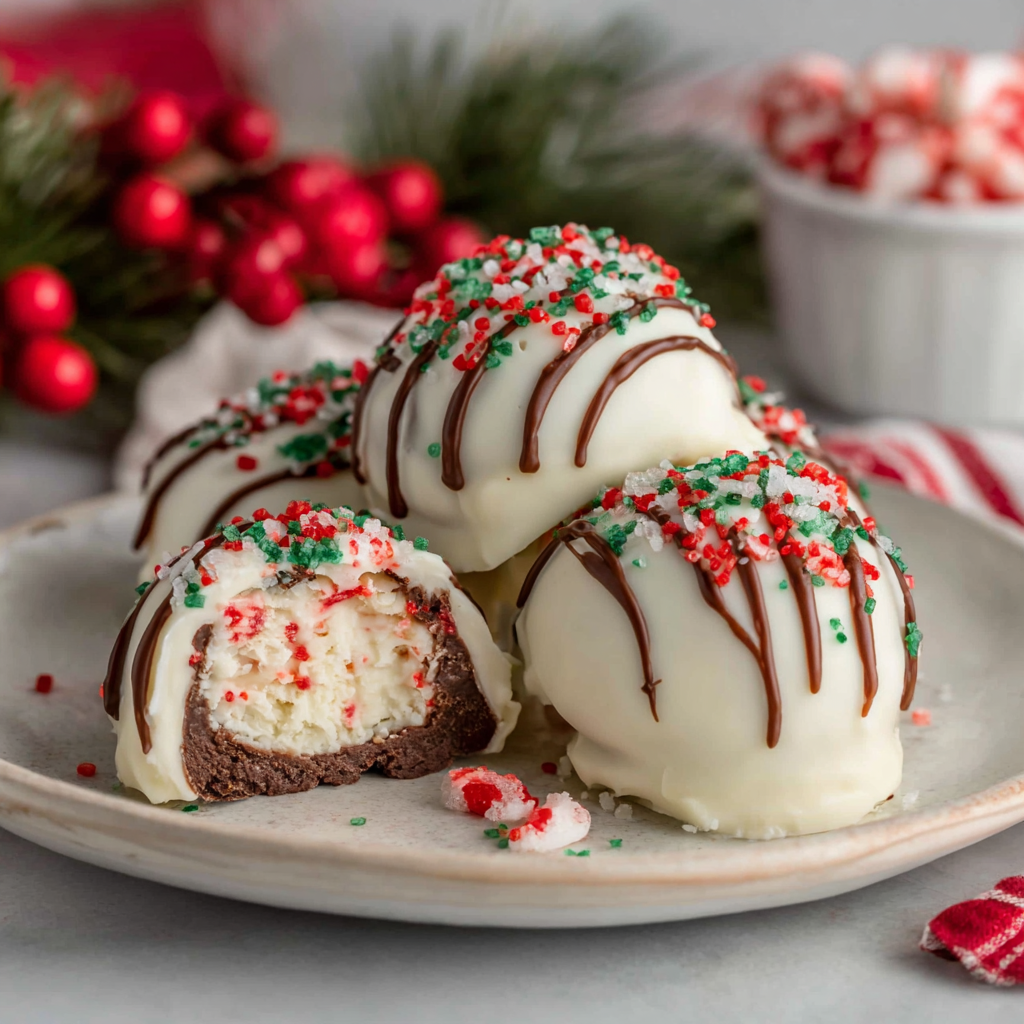
Step 6: Dip each truffle into the melted white chocolate and allow excess to drip off.
Using a fork or a toothpick, carefully dip each rolled truffle into the melted white chocolate. Allow any excess coating to drip back into the bowl. This step is important for achieving that perfect, even coating. It also prevents the truffles from becoming overly clumpy.
Step 7: Decorate with sprinkles before the chocolate hardens.
While the white chocolate is still wet, sprinkle your desired toppings over the truffles. This is the perfect moment to get creative with colors and shapes. The sprinkles not only add an eye-catching visual element but also contribute an additional texture to each bite.
Step 8: Let the truffles set in the refrigerator for about 20 minutes.
Place the coated truffles on a baking sheet lined with parchment paper and refrigerate them until the chocolate has hardened. Setting the truffles in the fridge firms up the chocolate coating, ensuring they maintain their integrity while also chilling the filling just a bit more, enhancing the overall experience.

The Secret to a Creamy Truffle Filling
A rich, creamy filling is at the core of a satisfying truffle. When mixing the crumbled cake with cream cheese, ensure your cream cheese is thoroughly softened to prevent lumps. This creates a smooth texture that mimics the delightful sponginess of the original Christmas Tree Cake, giving every bite that comforting feel of nostalgia.
Elevating the Coating with Flavor
While white chocolate is traditional here, consider elevating the coating with flavored chips or adding extracts to the melted chocolate. Vanilla or peppermint extract can accentuate the festive spirit, intensifying that holiday vibe. Experimenting with your coatings could result in unique flavor combinations that are memorable for your holiday gatherings.
Creative Decorating Ideas for a Fun Presentation
Presentation is key, especially during the holidays. Beyond traditional sprinkles, consider adding crushed peppermint candies, edible glitter, or even colored sugar to give your truffles a unique flair. These enhancements not only make your truffles look more festive but also add delightful crunch and new flavors that celebrate the season.
FAQs
What should I do if my truffle mixture is too dry?
If your truffle mixture is too dry, you can add a little more softened cream cheese or a splash of milk. This will help bind the mixture more effectively and achieve the desired consistency.
Can I scale the recipe for larger batches?
Absolutely! To scale the recipe, simply multiply the quantities of the ingredients by the number of servings you wish to make. Ensure you maintain the same ratios for the truffle mixture and coating.
Why did my white chocolate coating crack?
Cracks in the white chocolate coating can occur if it dries too quickly. Ensure you’re working at a comfortable room temperature and that the chocolate isn't overheated during melting.
Can I use dark chocolate instead of white for coating?
Yes, dark chocolate can be used as a coating, providing a richer flavor profile. Keep in mind that it will change the overall sweetness of the truffles.
What if my truffles are too sweet?
If your truffles are overly sweet, consider balancing the flavor by adding a pinch of salt to the mixture or using a less sweet coating like dark chocolate.
How can I make my truffles more festive?
You can make your truffles more festive by using holiday-themed sprinkles, adding edible glitter, or even drizzling melted chocolate in contrasting colors over the top.
Conclusion
Creating these delightful Christmas Tree Cake Truffles is not just a cooking project; it's an invitation to relive cherished holiday memories with each bite. The combination of flavors and textures serves as a homage to the beloved snack cakes, reimagined in a fun and festive way.
Whether you're making them for a holiday party or simply to enjoy at home, they’re sure to be a hit. With every truffle, you’ll spread joy and sweetness, capturing the true essence of the season.
Recipe Card
Delicious Truffles Inspired by Christmas Tree Cakes
Ingredients
Method
- Prepare the truffle mixture by crumbling the Little Debbie cakes into a large bowl.
- Add softened cream cheese to the crumbled cakes and mix until combined.
- Chill the mixture in the refrigerator for about 30 minutes.
- Scoop out portions of the mixture and roll them into balls.
- Melt the white chocolate chips with coconut oil until smooth.
- Dip each truffle into the melted white chocolate and allow excess to drip off.
- Decorate with sprinkles before the chocolate hardens.
- Let the truffles set in the refrigerator for about 20 minutes.
Notes
Additional serving suggestions: pair with a crisp salad, garlic bread, or roasted seasonal vegetables for balance.
For make-ahead, prep components separately and assemble just before heating to preserve texture.
Taste and adjust with acid (lemon/vinegar) and salt right at the end to wake up flavors.


