Introduction
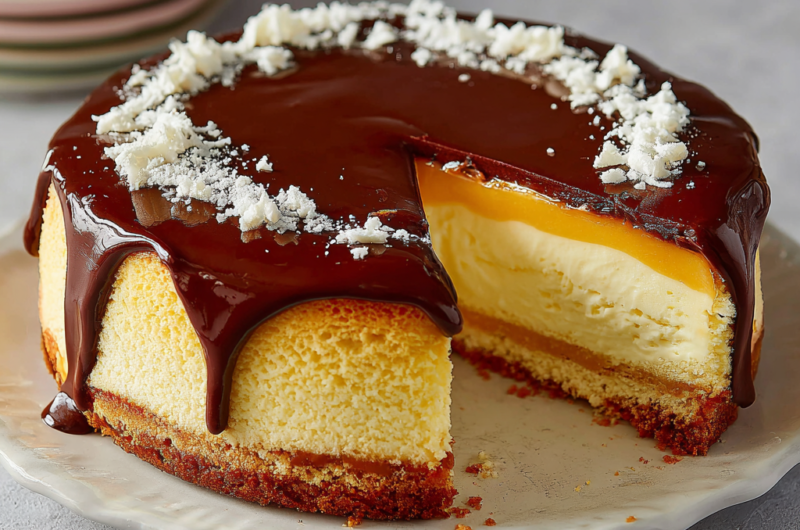
Boston Cream Cheesecake is an indulgent twist on the classic Boston cream pie. With a rich cheesecake base, velvety chocolate ganache, and a light, fluffy whipped cream topping, this dessert is sure to impress anyone who tries it.
Combining the creaminess of cheesecake with the flavors of vanilla and chocolate makes this dessert an irresistible option for gatherings or special occasions. Each bite is a delightful experience that melds textures and flavors beautifully.
Creating this show-stopping dessert at home is easier than you might think. With some preparation and patience, you can craft a Boston Cream Cheesecake that will become a favorite in your household.
Ingredients
- 1 ½ cups graham cracker crumbs
The base of the cheesecake, graham cracker crumbs provide a sweet and slightly crunchy texture. They hold the cheesecake together while adding a flavor reminiscent of classic desserts. - ½ cup unsalted butter, melted
Butter binds the graham cracker crumbs and adds richness to the crust, enhancing the overall flavor and helping the crust to crisp up nicely. - 3 (8 oz) packages cream cheese, softened
Cream cheese is the star of the cheesecake, providing a creamy and smooth texture. It contributes to the rich taste while ensuring the filling sets beautifully. - 1 cup granulated sugar
Sugar sweetens the cheesecake, balancing the tanginess of the cream cheese. It also plays a role in the texture, contributing to the creaminess when combined properly. - 1 teaspoon vanilla extract
Vanilla adds depth and enhances the overall flavor profile of the cheesecake. It provides a warm aroma that complements the chocolate ganache. - 3 large eggs
Eggs help the cheesecake set and achieve a smooth texture. They bind the ingredients together while allowing the cheesecake to rise slightly during baking. - 1 cup heavy cream
Heavy cream is essential for achieving a smooth and luscious cheesecake filling. It also contributes to a rich mouthfeel that defines a traditional cheesecake. - 8 oz semisweet chocolate, chopped
Semisweet chocolate is used for the ganache, providing a rich and decadent topping that contrasts beautifully with the creamy cheesecake. - ½ cup powdered sugar
Powdered sugar sweetens the ganache and helps to achieve a smooth, glossy finish. Its fine texture dissolves quickly, ensuring a silky consistency. - 1 cup whipped cream, for topping
Whipped cream adds lightness and a touch of sweetness on top of the cheesecake, balancing the richness and providing a lovely contrast in texture.
Directions & Preparation
Step 1: Preheat the oven to 325°F (160°C).
Preheating your oven is crucial for even baking. This ensures that your cheesecake cooks consistently and helps to prevent cracks on the surface, which can happen in a rapidly changing temperature.
Step 2: Prepare the graham cracker crust by mixing crumbs and melted butter.
Combine graham cracker crumbs and melted butter in a bowl until the texture resembles wet sand. This mixture will form the base of your cheesecake, so ensure all crumbs are coated for a sturdy, flavorful crust.
Step 3: Press the mixture into the bottom of a springform pan.
Press the crumb mixture firmly into the pan's base, creating an even layer. An even crust ensures a balanced flavor and texture throughout. Use the bottom of a measuring cup for an even press.
Step 4: Bake the crust for 10 minutes, then let it cool.
Baking the crust sets it and enhances its flavor by creating a slight crispness. Letting it cool allows the cheesecake filling to be poured without melting the crust.
Step 5: In a large mixing bowl, beat together cream cheese and sugar until smooth.
Beating these two ingredients until smooth is vital for a creamy filling. It incorporates air into the mixture, which results in a light texture when baked.
Step 6: Add eggs, beaten one at a time, mixing well after each addition.
Adding eggs one at a time allows for better incorporation, ensuring a smooth consistency. Overmixing at this stage can lead to cracks in the cheesecake.
Step 7: Stir in vanilla extract and heavy cream until just combined.
Gently folding in the heavy cream and vanilla helps maintain the light texture of the batter while adding flavor. Avoid overmixing to prevent a dense cheesecake.
Step 8: Pour the cream cheese mixture over the cooled crust and smooth the top.
Pouring the batter over the crust should be done gently to retain the crust's structure. Use a spatula to smooth out the top, which helps with even baking.
Step 9: Bake for 50-60 minutes, or until set in the center.
Baking at the correct temperature for the right time is crucial. The cheesecake should be firm yet slightly jiggly in the center, indicating that it is cooked through without being overbaked.
Step 10: Turn off the oven and leave the cheesecake inside with the door ajar for an hour.
This gentle cooling process allows the cheesecake to gradually adjust to room temperature, reducing the chances of cracks forming. It prevents the sudden temperature drop that often causes cracking.
Step 11: Chill the cheesecake in the refrigerator for at least 4 hours, preferably overnight.
Chilling the cheesecake overnight enhances the flavors and allows it to firm up properly. This resting period is important for slicing and presenting the dessert.
Step 12: Prepare the ganache by heating cream and adding chocolate to melt.
Gently heating the cream and then stirring in the chocolate allows for a smooth, glossy ganache. Ensuring the chocolate is chopped finely helps it melt evenly.
Step 13: Let the ganache cool slightly before spreading over the cheesecake.
Allowing the ganache to cool ensures it won't melt the cheesecake layers underneath when applied. A good spread will enhance the dessert's visual appeal and flavor.
Step 14: Top with whipped cream before serving.
Adding whipped cream not only creates a lovely presentation but also balances the rich flavors of the cheesecake and ganache. It adds a lightness that makes each bite refreshing.

The Secret to a Perfectly Smooth Ganache
To achieve a glossy, smooth ganache for your Boston Cream Cheesecake, it's essential to chop the chocolate into small, uniform pieces. This helps it melt evenly when combined with hot cream. Stir the mixture gently and patiently until all the chocolate is completely melted and integrated. If your ganache appears too thick, you can add a splash of cream to thin it out, ensuring it spreads perfectly over the cheesecake.
Choosing the Right Cream Cheese
When making a cheesecake, the quality of cream cheese can significantly impact the final product. Opt for a full-fat cream cheese for the best results, as it provides a rich flavor and creamy texture. Brands can vary in texture, so avoid reduced-fat versions or non-dairy substitutes that might alter the taste and consistency of your cheesecake, leading to disappointing outcomes.
Serving Suggestions for Boston Cream Cheesecake
This Boston Cream Cheesecake pairs beautifully with fresh berries or a raspberry compote. The acidity of the berries cuts through the richness of the cheesecake, adding vibrant color and flavor. For a more decadent presentation, consider adding chocolate shavings or a drizzle of caramel sauce on top, enhancing the visual appeal while providing an enjoyable contrast of flavors.
FAQs
What can I do if my cheesecake rises too much?
If your cheesecake rises significantly and then cracks as it cools, it may have been overmixed. Be gentle when incorporating eggs and avoid excessive beating to keep the mixture light.
Can I use a different type of chocolate for the ganache?
Yes, you can use milk chocolate or dark chocolate for the ganache. Just adjust the amount of sugar in the cheesecake if the chocolate's sweetness differs from semisweet.
Why is my cheesecake too dense?
A dense cheesecake may occur from overmixing the batter or using low-fat cream cheese. Ensure to beat just until combined and use full-fat cream cheese for better results.
Should I cover the cheesecake while it sets in the fridge?
It's best to leave the cheesecake uncovered to allow it to firm up properly. Covering it may trap excess moisture, affecting the texture.
Is it possible to scale this recipe down?
Yes, you can easily halve the ingredients and use a smaller pan to make a smaller cheesecake. Adjust the baking time accordingly, as a smaller cheesecake may bake faster.
What if my ganache doesn't set properly?
If your ganache remains too runny, it may need more time to cool and thicken. For thicker ganache, try adding more chocolate or chilling it for a bit longer before spreading.
Conclusion
Creating your own Boston Cream Cheesecake is a rewarding experience that allows for personal touches and creativity. With its rich flavors and luxurious textures, this dessert is sure to be a hit at any gathering.
By following these steps and tips, you’ll find yourself mastering not only this recipe but also the art of cheesecake making. Enjoy every slice and share it with those you love for a truly special occasion.
Recipe Card
Indulge in a Delicious Coconut Almond Cake
Ingredients
Method
- Preheat your oven to 350°F (175°C).
- Grease and flour two 9-inch round cake pans.
- In a large mixing bowl, cream together the softened butter and granulated sugar until light and fluffy.
- Add the eggs, one at a time, mixing well after each addition.
- Stir in the coconut milk and vanilla extract until combined.
- In a separate bowl, whisk together the flour, baking powder, ground almonds, and salt.
- Gradually fold the dry ingredients into the wet mixture, being careful not to overmix.
- Gently fold in the shredded coconut until just combined.
- Divide the batter evenly between the prepared cake pans and smooth the tops.
- Bake in the preheated oven for 25-30 minutes or until a toothpick inserted in the center comes out clean.
- Allow the cakes to cool in the pans for 10 minutes before transferring them to a wire rack to cool completely.
Notes
Additional serving suggestions: pair with a crisp salad, garlic bread, or roasted seasonal vegetables for balance.
For make-ahead, prep components separately and assemble just before heating to preserve texture.
Taste and adjust with acid (lemon/vinegar) and salt right at the end to wake up flavors.


