Introduction
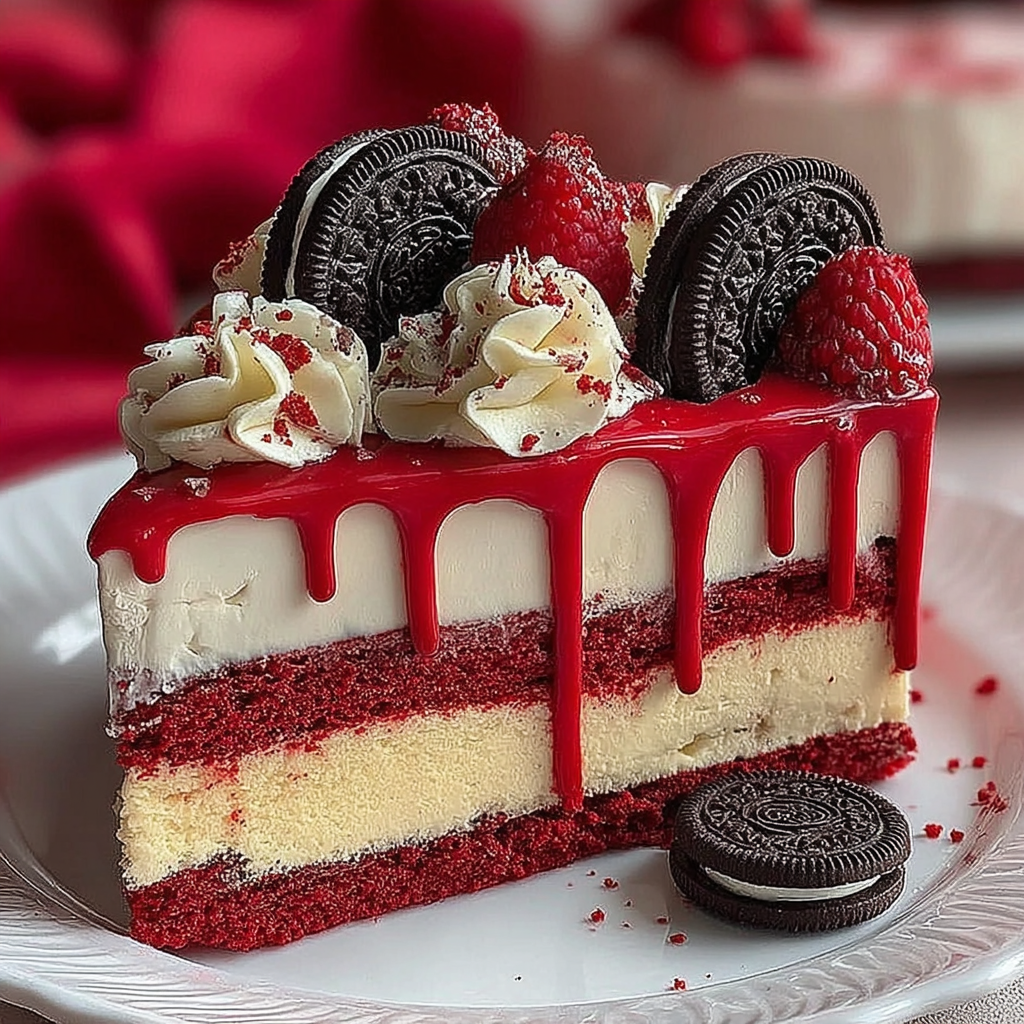
Indulging in a show-stopping dessert can bring life to any occasion, and this Oreo Red Velvet Cheesecake Drip Cake is no exception. Combining the rich, velvety texture of red velvet cake with the creamy delight of cheesecake, all wrapped in a luscious chocolate drip and crushed Oreo topping, this cake promises to impress.
Perfect for celebrations or simply treating yourself, this dessert not only tastes divine but also looks stunning. Layers of smooth cheesecake sit between moist red velvet cake, ensuring each slice is a harmonious blend of flavors that will leave your taste buds dancing.
Ingredients
- 2 ½ cups all-purpose flour
All-purpose flour forms the structure of the cake. It provides the necessary gluten that helps the cake rise and gives it a tender texture. Ensuring you measure it correctly is crucial for the perfect consistency. - 1 cup unsweetened cocoa powder
Cocoa powder adds depth of flavor and richness to the red velvet cake and contributes to its striking color. Unsweetened cocoa maintains balance in sweetness, allowing the other flavors to shine. - 2 cups granulated sugar
Sugar not only sweetens the cake but also helps with moisture retention. It carmelizes during baking, contributing to flavor and texture, making every bite deliciously soft. - 1 teaspoon baking soda
Baking soda is a leavening agent that helps the cake rise. It reacts with acidic ingredients, creating carbon dioxide bubbles that give the cake its lightness. - 1 teaspoon salt
Salt enhances the flavors in sweet baked goods and balances the sweetness. It can also strengthen the gluten structure, resulting in a better rise. - 1 cup vegetable oil
Oil contributes to the cake's moistness and tenderness. Unlike butter, it remains liquid at room temperature, ensuring the cake stays soft. - 1 cup buttermilk
Buttermilk adds a tangy flavor and reacts with baking soda for leavening. Its acidity also tenderizes the gluten, enhancing the cake's texture. - 2 large eggs
Eggs add structure and stability to the cake. They also act as binding agents and contribute to moisture and richness. - 1 tablespoon white vinegar
Vinegar reacts with baking soda to help the cake rise and stabilizes the red color. It adds a touch of acidity that brightens the overall flavor. - 1 teaspoon vanilla extract
Vanilla enhances the overall flavor profile of the cake. It adds warmth and depth, balancing the cocoa's richness. - 1 ½ cups cream cheese
Cream cheese is the foundation of the cheesecake filling, providing that rich, creamy texture and tangy flavor that contrasts beautifully with the sweetness of the red velvet. - 1 cup powdered sugar
Powdered sugar sweetens the cream cheese filling and creates a smooth consistency, enhancing the overall mouthfeel of the cheesecake. - 1 teaspoon vanilla extract (for cheesecake)
This addition of vanilla to the cheesecake filling also enriches its flavor and ties together the sweet and tangy components. - 1 cup heavy cream
Heavy cream is essential for the frosting and drip; it whips beautifully and provides a rich and luscious texture that elevates the overall decadence of the cake. - ½ cup crushed Oreos (for topping)
Crushed Oreos introduce a delightful crunch and chocolate flavor that complements the rich cheesecake and red velvet, adding both visual appeal and taste. - ½ cup semi-sweet chocolate (for drip)
Melting semi-sweet chocolate creates a glossy, rich drizzle that adds a decadent finish to the cake, enhancing both its flavor and appearance.
Directions & Preparation
Step 1: Preheat your oven to 350°F (175°C) and prepare three 8-inch cake pans.
Preheating the oven ensures even baking, which is crucial for consistent cake texture. Coat the cake pans with baking spray and line the bottoms with parchment paper to prevent sticking, ensuring your cake layers come out smoothly.
Step 2: In a large mixing bowl, combine flour, cocoa powder, baking soda, and salt.
Mixing the dry ingredients first helps to evenly distribute the leavening agents and cocoa powder, which ensures a uniform flavor and texture throughout the cake. This step is key to preventing clumps and ensuring an even rise.
Step 3: In another bowl, mix the vegetable oil, sugar, eggs, buttermilk, vinegar, and vanilla extract.
Combining wet ingredients separately allows for thorough mixing. The oil and sugar will create a smooth base, while the eggs add richness. This helps achieve a moist and tender crumb in the finished cake.
Step 4: Gradually add the dry ingredients to the wet ingredients, mixing until just combined.
Mixing until just combined prevents overworking the batter, which can lead to a dense cake. It’s perfectly fine if there are a few lumps left; they will bake out during the cooking process.
Step 5: Divide the batter evenly among the prepared cake pans and smooth the tops.
Evenly divided batter ensures that all layers bake consistently, resulting in a cohesive cake. Smoothing the tops also assists in achieving a flat surface for stacking the layers.
Step 6: Bake for 25–30 minutes or until a toothpick inserted in the center comes out clean.
Baking time is crucial for the structure of the cake; using a toothpick to test for doneness guarantees the layers are baked perfectly without being dry. The layers will continue to cook slightly after being removed from the oven due to residual heat.
Step 7: Allow the cakes to cool in the pans for 10 minutes, then transfer to wire racks to cool completely.
Cooling the cakes in the pans initially helps set their structure before transferring them to wire racks, which allows even cooling. If left too long in the pans, they may become soggy.
Step 8: Prepare the cheesecake filling by beating the cream cheese, powdered sugar, and vanilla extract until smooth.
Whipping the cream cheese until smooth is essential to achieving a lump-free filling. It creates a luscious texture that contrasts perfectly with the cake layers, ensuring an indulgent bite.
Step 9: Layer the cooled red velvet cakes with the cheesecake filling in between.
Assembling the cake with layers of cheesecake filling not only enhances flavor but also creates a delightful texture contrast. Spread the filling evenly to avoid any bulging layers.
Step 10: Frost the top and sides of the cake with a light layer of whipped heavy cream.
Applying a crumb coat of whipped cream locks in crumbs for a clean final appearance. This layer serves as a base for additional decoration and adds a luscious creaminess that complements the cake.
Step 11: Prepare the chocolate drip by melting semi-sweet chocolate and combining it with heavy cream.
Creating the drip starts with melting chocolate, which should be smooth and glossy. Mixing in heavy cream adjusts the consistency to achieve the desired drip effect. A slightly warm drip will flow beautifully down the sides of the cake.
Step 12: Pour the chocolate drip around the edges of the cake, allowing it to cascade down.
Carefully pouring the drip at the cake's edge ensures a beautiful finish. The warmth of the chocolate helps it flow smoothly, creating an eye-catching look that adds to the decadence of the dessert.
Step 13: Top the cake with crushed Oreos and additional whipped cream, if desired.
Finishing the cake with crushed Oreos not only elevates its visual appeal but also adds a textural contrast to each bite. The extra whipped cream creates an indulgent look and appeals to those who love creamy toppings.

The Magic of Red Velvet
Red velvet cake distinguishes itself with its signature color and unique flavor profile, achieved through the careful balance of cocoa and buttermilk. The addition of vinegar enhances its rich hue while ensuring a tender crumb. This dessert’s eye-catching appearance combined with its subtly chocolatey taste makes it a standout for any occasion.
The Cheesecake Layer
Adding a cheesecake layer to a traditional red velvet cake significantly elevates the dessert's richness and creaminess. The tangy notes from cream cheese provide a delightful contrast to the sweetness of the red velvet, making each bite a flavor sensation. This combination not only enhances the flavor but also adds a luxurious texture, creating a decadent treat.
Drip Cake Aesthetics
A drip cake offers a perfect opportunity to showcase your creativity in dessert presentation. The glossy chocolate drip creates an appealing visual effect that entices the eye and enhances the cake's elegance. Layering crushed Oreos on top not only contributes to the cake's crunch but also adds a unique touch that really ties the flavors together beautifully.
FAQs
What can I do if the cheesecake filling is too thick?
If the filling is too thick, try adding a tablespoon or two of heavy cream while mixing until you achieve your desired consistency. This will make it spreadable without losing its rich flavor.
Could I substitute the Oreos with another cookie for the topping?
Absolutely! You can use chocolate wafer cookies or even graham crackers for a different flavor profile. Adjust the quantity based on the cookie’s texture to maintain the crunch.
What if my chocolate drip doesn't flow down the sides?
If your drip is too thick, warming it slightly in the microwave can help. Stir it to blend, then test the drip’s consistency before pouring.
How can I achieve a smoother cheesecake filling?
Be sure to mix the cream cheese thoroughly before adding any other ingredients, ensuring it's at room temperature to promote a creamy consistency.
What’s the best way to slice through the layers without damaging them?
Using a serrated knife, run it under hot water and wipe it dry before slicing. This will help you make clean cuts through your cake.
What other toppings would complement this cake?
Consider adding fresh berries for a touch of tartness or chocolate shavings to intensify the chocolate flavor while providing additional elegance.
Conclusion
Making a Decadent Oreo Red Velvet Cheesecake Drip Cake is an adventurous way to enhance your baking skills while delighting your guests. With its stunning presentation and rich flavors, it's truly a dessert that will leave a lasting impression.
Whether it’s a birthday celebration, an anniversary, or just a lovely weekend treat, this cake embodies joy and indulgence. Dive into this recipe, and you’ll find that even the most elaborate desserts can be achieved in the comfort of your home.
Recipe Card
Notes
Additional serving suggestions: pair with a crisp salad, garlic bread, or roasted seasonal vegetables for balance.
For make-ahead, prep components separately and assemble just before heating to preserve texture.
Taste and adjust with acid (lemon/vinegar) and salt right at the end to wake up flavors.


