Introduction
There's something undeniably comforting about a hearty sandwich, especially when it's packed with flavors of Italian cuisine. One-Pan Baked Italian Sub Sandwiches combine all the classic elements of a sub into a simplified, yet indulgent dish that you can prepare with ease. This recipe is perfect for busy weeknights or casual gatherings with friends and family.
Imagine tender meats, melted cheese, and a medley of vibrant vegetables nestled between soft, toasted bread, all baked together in one pan. Not only does this recipe minimize the cleanup, but it also allows the flavors to meld in a delightful way. Let’s dive into the world of Italian subs and discover how to bring that deli experience right to your home kitchen.
Ingredients
- 1 loaf of Italian bread (12 inches)
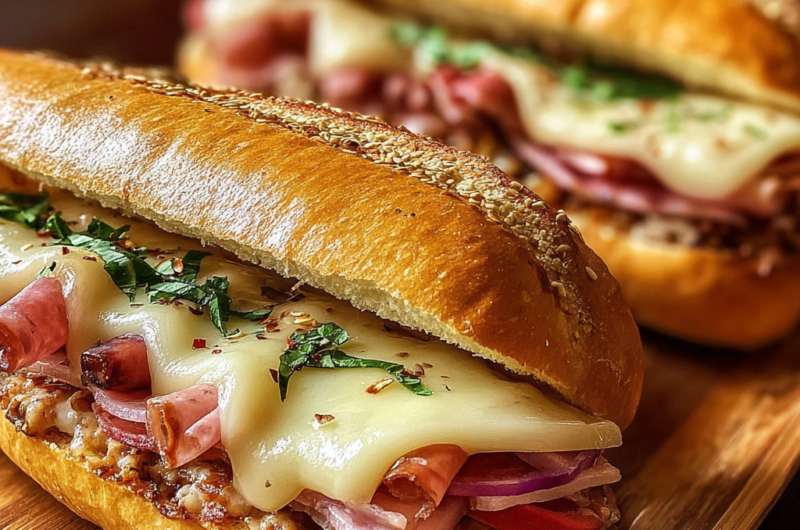
The foundation of any great sub, Italian bread brings a chewy texture and slightly crispy crust. Its size and shape make it perfect for holding an array of fillings without falling apart. - 8 ounces of genoa salami
This delicious cured meat adds a rich, savory flavor that defines the Italian sub experience. Its fat content also contributes to the overall moisture and heartiness of the sandwich. - 8 ounces of sliced pepperoni
Pepperoni brings a zesty spiciness and a satisfying chew that complements the salami beautifully. It's a popular choice for Italian sandwiches and enhances the dish's overall taste profile. - 8 ounces of ham (thinly sliced)
Adding layers of ham introduces a subtle sweetness that balances the spiciness of the pepperoni and salami. It also contributes to a tender mouthfeel. - 8 ounces of provolone cheese
Provolone is a classic choice for Italian subs, providing a creamy texture and mild flavor. When melted, it adds richness and helps bind the sandwich together. - 1 cup of sliced bell peppers (red, green, yellow)
Bell peppers not only add a crunch but also a pop of color and sweetness. They bring a fresh element that contrasts nicely with the rich meats and cheese. - 1 cup of sliced red onion
The sharpness of red onion enhances the sandwich’s flavor and adds a bit of bite. It also provides a fresh crunch that elevates the overall texture. - 1 cup of marinara sauce
This sauce ties all the flavors together and adds moisture to the sandwich. Using marinara also incorporates a delicious tanginess reminiscent of traditional Italian fare. - 1 tablespoon of Italian seasoning
Italian seasoning combines multiple herbs and spices, deepening the flavor profile of the dish. This blend is essential for achieving that authentic Italian taste. - Salt and pepper to taste
Seasoning enhances all the individual flavors in the recipe, ensuring a well-rounded taste. Adjusting the amount allows for customization based on personal preference.
Directions & Preparation
Step 1: Preheat your oven to 375°F (190°C).
Preheating the oven ensures that your sandwich bakes evenly and the bread becomes crisp. This step is crucial for achieving that perfect golden-brown finish on the outside of the Italian sub.
Step 2: Slice the Italian bread in half, lengthwise, without cutting all the way through.
This creates a hinge effect, allowing you to fill the bread without it falling apart. Ensuring a solid base is essential for layering in your delicious fillings securely.
Step 3: Layer the bottom half of the bread with salami, pepperoni, and ham.
Starting with the meats provides a foundation of flavor, with each slice working harmoniously together. This arrangement also helps to distribute flavors evenly throughout the sandwich.
Step 4: Add a layer of provolone cheese over the meats.
The cheese not only adds creaminess and richness but also acts as a glue for the other ingredients. A generous layer ensures that each bite is flavorful and satisfying.
Step 5: Top with bell peppers, red onion, and sprinkle Italian seasoning, salt, and pepper.
Fresh vegetables add crunch and earthy flavors while the seasoning melds the dish together. Remember that layering ingredients properly raises the flavor profile of each bite.
Step 6: Spread marinara sauce liberally over the top half of the bread.
This step adds moisture and flavor to the sandwich. The sauce's richness balances the savory elements from the meats and cheese while keeping the bread from drying out.
Step 7: Carefully place the top half of the bread back on the sandwich and wrap in foil.
Wrapping in foil traps steam, allowing the cheese to melt effectively while keeping the bread from becoming too hard. It’s essential for achieving that gooey, delicious interior.
Step 8: Bake for 20-25 minutes until the bread is toasted and the cheese has melted.
Baking allows the flavors to meld beautifully. Watching for a golden crust ensures the sandwich is both chewy on the inside and has a satisfying crunch on the outside.
Step 9: Remove from the oven and let it cool slightly before slicing into portions.
Allowing the sandwich to cool for a few moments helps avoid burns from hot cheese. Slicing systematically into portions makes it easier to serve and enjoy.
Step 10: Serve warm, preferably with extra marinara sauce on the side.
Serving with sauce on the side offers an opportunity to enjoy extra flavor with each bite. It’s a great way to savor every component and enrich your eating experience.

Layering Flavors for Impact
The key to a well-rounded and satisfying flavor in One-Pan Baked Italian Sub Sandwiches is in the layering. Start with your choice of cured meaty treats and follow through with fresh, vibrant vegetables. Each layer should complement the others, creating a collective experience that is much greater than the sum of its parts.
Choosing the Right Bread
Selecting the right bread is critical in ensuring your sandwich holds up under the weight of hearty fillings. Italian bread is ideal due to its moist interior and crusty exterior, allowing it to absorb some of the marinara without disintegrating. Additionally, it brings an authentic touch to your Italian sub.
The Importance of Perfect Baking
Baking your sandwich in the oven ensures that everything melts together harmoniously. The heat makes the cheese gooey and allows the flavors to mingle beautifully. Pay attention to timing; this is where the outdoor crispiness meets an interior sensation, enhancing every mouthful.
FAQs
Can I use different meats for this sandwich?
Absolutely! Feel free to experiment with meats like turkey, roast beef, or even chicken to create your ideal sandwich.
What if my sandwich feels too dry after baking?
If your sandwich turns out dry, consider adding more marinara sauce or using a richer blend of cheese that melts well. Ensuring your layers are adequately distributed can also help.
Is it ok to adjust the quantities for a smaller group?
Certainly! You can scale down the ingredient quantities to match your needs, keeping the same ratios for a personalized version.
What can I do if the cheese isn't melting properly?
If your cheese isn’t melting well, you might want to cover your sandwich tightly with foil during the initial baking. This traps heat and moisture, allowing the cheese to melt fully.
Can I use whole-wheat bread instead of Italian bread?
While you can substitute whole-wheat bread for Italian, be mindful that it may not provide the same texture or flavor as traditional Italian bread.
What type of marinara sauce is best to use?
A homemade sauce usually yields the best flavor, but a store-bought high-quality marinara works well when you’re short on time.
Conclusion
One-Pan Baked Italian Sub Sandwiches are as delicious as they are easy to make. Perfect for any occasion, this recipe transforms classic flavors into a comforting dish that everyone can enjoy. The best part? Cleanup is a breeze, letting you focus more on savoring every bite rather than washing dishes.
With a few fresh ingredients and spices, you can recreate the beloved Italian sandwich experience right in your own kitchen. So gather your ingredients, invite some friends, and enjoy a meal filled with warmth, flavor, and a sense of togetherness.
Recipe Card

Creating Delightful Candy Apples at Home
Ingredients
Method
- Prepare the apples.
- Make the candy coating.
- Add food coloring (if desired).
- Dip the apples.
- Set the apples to cool.
- Decorate (optional).
- Enjoy your candy apples!
Notes
Additional serving suggestions: pair with a crisp salad, garlic bread, or roasted seasonal vegetables for balance.
For make-ahead, prep components separately and assemble just before heating to preserve texture.
Taste and adjust with acid (lemon/vinegar) and salt right at the end to wake up flavors.


