Introduction
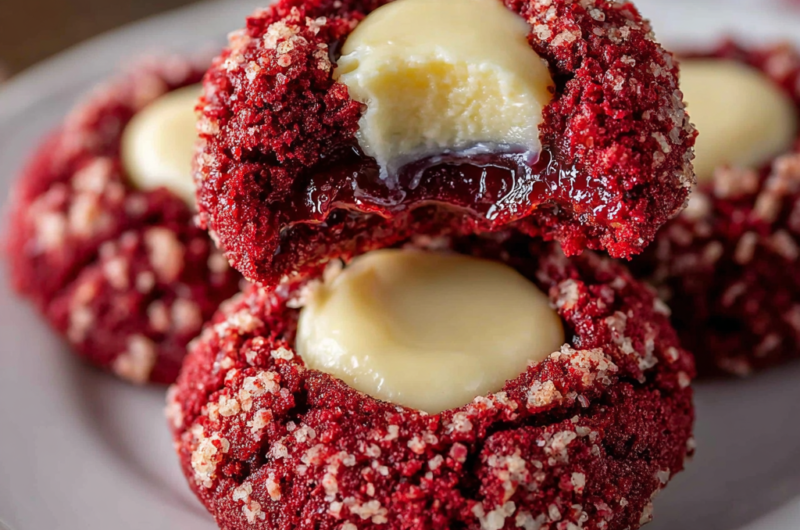
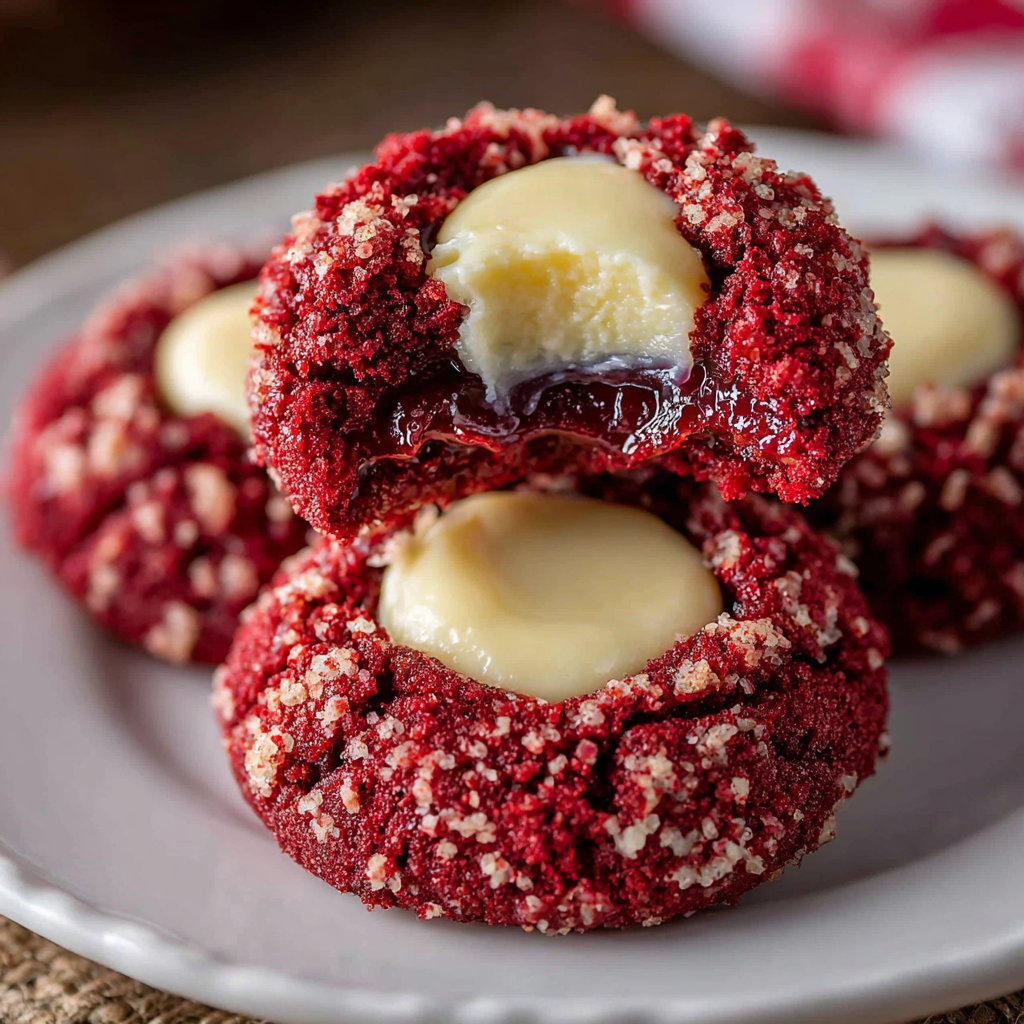
There's something irresistibly charming about red velvet cookies, especially when they offer a delightfully soft texture combined with a whimsical touch of color. These Soft & Chewy Red Velvet Thumbprint Cookies not only look stunning on any platter but also deliver on flavor, making them a perfect dessert for gatherings or just a sweet treat at home.
Each cookie features a tender, chewy bite with a rich, cocoa undertone, complemented by a sweet filling of your choice. To elevate the experience, consider pairing your thumbprint creation with a cream cheese frosting or your favorite fruit preserves. Let’s dive into the world of baking, where we’ll explore the ingredients and steps to achieve cookie perfection.
Ingredients
- 2 cups all-purpose flour
All-purpose flour provides the structure of the cookies. It balances tenderness and chewiness, which is essential for achieving that soft and chewy texture. - 2 tablespoons unsweetened cocoa powder
Unsweetened cocoa powder adds a mild chocolate flavor to the cookies, giving them depth without overpowering the signature red velvet taste. - 1 teaspoon baking soda
Baking soda acts as a leavening agent, helping the cookies rise slightly and creating a soft texture. It also helps achieve that characteristic chewy bite. - 1/2 teaspoon salt
Salt enhances the overall flavor, counteracting the sweetness and bringing out the rich cocoa notes in the cookies. - 1/2 cup unsalted butter, softened
Butter adds richness and flavor to the cookies. When creamed properly with sugar, it creates air pockets that contribute to a lighter texture. - 1 cup granulated sugar
Sugar not only sweetens the cookies but also contributes to the texture. It caramelizes during baking, adding to the chewiness. - 1 large egg
The egg binds the ingredients together and helps create a tender crumb. It also adds moisture to the mixture. - 1 teaspoon vanilla extract
Vanilla extract enhances the flavor profile, making every bite more aromatic and delicious. - 1 tablespoon red food coloring
Food coloring gives these cookies their signature red hue, making them visually appealing while not altering the flavor significantly. - 1/2 cup filling of choice (jam, frosting, etc.)
The filling adds a burst of flavor and contrast in texture, serving as the signature thumbprint feature of these cookies.
Directions & Preparation
Step 1: Preheat your oven to 350°F (175°C).
Preheating the oven ensures that your cookies bake evenly and at the correct temperature from the start. This step is crucial for achieving the perfect texture—too hot, and the cookies may spread too much; too cool, and they can become dense.
Step 2: In a bowl, whisk together the flour, cocoa powder, baking soda, and salt.
Mixing the dry ingredients upfront ensures that the leavening agent is evenly distributed throughout the flour. This step helps achieve a uniform texture and flavor profile in the cookies.
Step 3: In a separate mixing bowl, cream together the softened butter and granulated sugar until light and fluffy.
Creaming the butter and sugar properly incorporates air into the mixture, which contributes to the cookies’ fluffiness. Aim for a pale, fluffy consistency; this is key for a tender cookie.
Step 4: Add the egg, vanilla extract, and red food coloring to the creamed mixture, mixing until well combined.
Incorporating these wet ingredients not only adds moisture but also affects the final color and flavor of the cookies. Mix until just combined to avoid overworking the dough.
Step 5: Gradually add the dry ingredients to the wet mixture, mixing until just combined.
Overmixing at this stage can lead to tough cookies, so mix gently until no flour pockets remain. This careful folding in is what keeps your cookies soft and chewy.
Step 6: Scoop tablespoon-sized amounts of dough and roll into balls.
Rolling the dough into balls will help form a uniform size for baking, ensuring even cooking. The size you choose is important; larger balls may need more cooking time.
Step 7: Place the dough balls on a baking sheet lined with parchment paper, spacing them about 2 inches apart.
Spacing the cookies appropriately allows for even spreading during baking. The parchment paper also prevents sticking and promotes even baking.
Step 8: Use your thumb or a small spoon to make an indentation in the center of each cookie ball.
Creating the indentation not only gives these cookies their characteristic look but also provides a perfect pocket for the filling. If the cookies puff up too much during baking, the indent will ensure room for the filling.
Step 9: Fill each thumbprint with your chosen filling, being careful not to overfill.
Filling the indent with just the right amount ensures the filling stays in place during baking. Overfilling may cause spills, affecting both the appearance and cooking of the cookies.
Step 10: Bake in the preheated oven for 10-12 minutes or until the edges are set.
Baking times can vary based on your oven. It’s important to monitor the cookies closely to prevent overbaking—look for slightly firm edges with soft centers for that ideal chewy texture.
Step 11: Allow the cookies to cool on the baking sheet for a few minutes before transferring them to a wire rack.
Letting the cookies cool slightly will allow them to firm up a bit, making it easier to transfer them without breaking. Cooling on a wire rack helps them to finish setting and prevents sogginess from steam.

The Art of Red Velvet
Red velvet owes its vibrant hue to a reaction between cocoa powder and acidic ingredients. This unique touch not only delivers a visual treat but also influences taste, providing subtle hints of chocolate paired with the tanginess that elevates the flavor profile. Perfect for special occasions, this cookie captures the eyes and the palate.
Choosing the Right Filling
The filling is one of the most exciting aspects of these thumbprint cookies. From rich cream cheese frosting to sweet raspberry jam, selecting the right topping can bring an additional layer of flavor that complements the soft, chewy texture of the cookies. The interplay of flavors makes every bite a new experience.
Tips for Perfect Cookies
Successful baking requires attention to detail. One useful tip is to ensure your butter is at the correct temperature—room temperature butter creamed with sugar results in a better cookie structure. Additionally, using a kitchen scale can help in measuring ingredients accurately, yielding consistently delicious results!
FAQs
What if my dough seems too sticky?
If the dough is too sticky, you can add a little more flour, a tablespoon at a time, until it reaches a manageable consistency. Just be cautious not to add too much, as this might affect the texture.
Can I use a different filling other than jam?
Absolutely! Cream cheese frosting, chocolate ganache, or even a dollop of nut butter can create delicious variations. Get creative with flavors that you enjoy.
How can I tell if the cookies are done baking?
Look for slightly firm edges and a soft center when baking. Cookies will continue to firm up as they cool on the baking sheet.
What if my cookies turn out too flat?
Flat cookies are often a sign that the dough was too warm or that the butter was too soft. Chill the dough before forming balls and consider checking your oven temperature for accuracy.
Can I double the recipe?
Yes, you can double the ingredients to make more cookies, just keep in mind that baking times may slightly vary based on size and batch quantity.
What if my cookies are too sweet?
Consider adjusting the sugar next time or pair the cookies with a more tart filling to balance out the sweetness.
Conclusion
Baking Soft & Chewy Red Velvet Thumbprint Cookies is not only an enjoyable culinary adventure but also a way to create beautiful, delicious memories. Whether for a holiday celebration, a birthday party, or just a cozy evening at home, these cookies are sure to delight anyone who tries them.
Embrace the joy of creating something special in your kitchen. With each bite, you're not just tasting a cookie, you're enjoying the efforts of your labor and the sweetness of life—one thumbprint at a time.
Recipe Card
Deliciously Soft & Chewy Red Velvet Thumbprint Cookies
Ingredients
Method
- Preheat your oven to 350°F (175°C).
- In a bowl, whisk together the flour, cocoa powder, baking soda, and salt.
- In a separate mixing bowl, cream together the softened butter and granulated sugar until light and fluffy.
- Add the egg, vanilla extract, and red food coloring to the creamed mixture, mixing until well combined.
- Gradually add the dry ingredients to the wet mixture, mixing until just combined.
- Scoop tablespoon-sized amounts of dough and roll into balls.
- Place the dough balls on a baking sheet lined with parchment paper, spacing them about 2 inches apart.
- Use your thumb or a small spoon to make an indentation in the center of each cookie ball.
- Fill each thumbprint with your chosen filling, being careful not to overfill.
- Bake in the preheated oven for 10-12 minutes or until the edges are set.
- Allow the cookies to cool on the baking sheet for a few minutes before transferring them to a wire rack.
Notes
Additional serving suggestions: pair with a crisp salad, garlic bread, or roasted seasonal vegetables for balance.
For make-ahead, prep components separately and assemble just before heating to preserve texture.
Taste and adjust with acid (lemon/vinegar) and salt right at the end to wake up flavors.


