Introduction
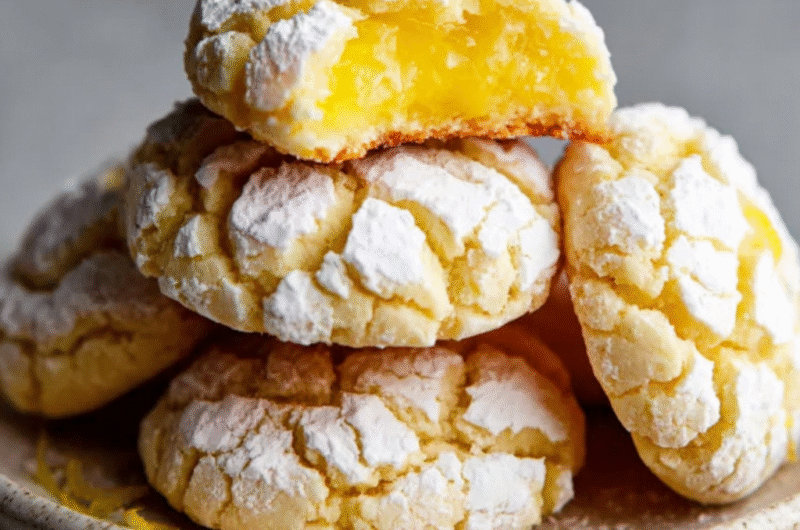
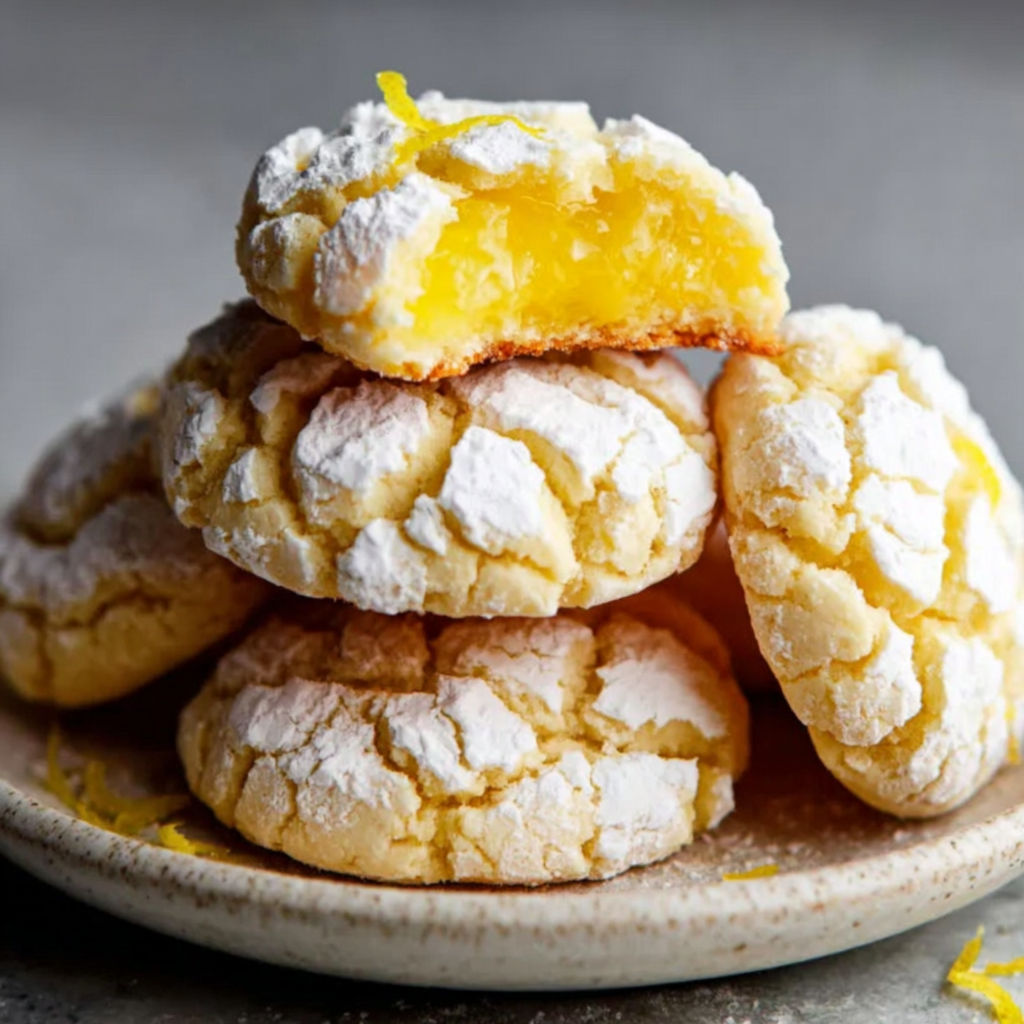
When you're craving something sweet with a citrusy twist, gluten-free lemon crinkle cookies hit the spot. These cookies offer a vibrant burst of lemon flavor and a beautifully textured crinkle top, promising both visual appeal and satisfying taste.
Gluten-free baking can often feel challenging, but with the right ingredients and methods, you can create delicious treats that rival traditional versions. These lemon crinkle cookies are not only easy to make but also perfect for gatherings, as they please gluten-free and gluten-loving eaters alike.
Ingredients
- 2 cups gluten-free all-purpose flour
The base of the cookies, gluten-free all-purpose flour provides the necessary structure. A blend containing xanthan gum or another binding agent helps mimic the elasticity of wheat flour. - 1 teaspoon baking powder
Baking powder is essential for leavening the cookies, helping them rise and achieve that light, airy texture. It reacts with the wet ingredients to produce gas bubbles that create a fluffy cookie. - ½ teaspoon baking soda
Baking soda aids in browning and contributes to a slightly chewy texture. It also reacts with acidic ingredients, such as lemon juice, to add to the rise and texture. - ½ teaspoon salt
Salt enhances the overall flavor of the cookies, balancing the sweetness. It also strengthens the dough's structure by slightly tightening the gluten-free flour. - ½ cup unsalted butter, softened
Butter adds richness and moisture to the cookies, making them tender and flavorful. The fat also helps create a desirable texture that melts in your mouth. - 1 cup granulated sugar
Granulated sugar not only sweetens the cookies but also supports the crinkling effect on the surface when baked. It caramelizes slightly, adding depth to the flavor. - 1 large egg
Eggs provide binding and moisture, promoting a chewy texture while also helping the cookies rise. They contribute to the cookies' structure and flavor. - 1 tablespoon fresh lemon juice
Fresh lemon juice infuses the cookies with a bright, zesty flavor that is the star of the recipe. It also reacts with baking soda to enhance the cookie's rise and texture. - Zest of 1 lemon
Lemon zest adds an aromatic quality and more concentrated lemon flavor, enhancing the overall citrus profile of the cookies for a refreshing bite. - Powdered sugar, for dusting
Powdered sugar creates a beautiful sweet coating on the cookies, giving them their signature crinkle appearance and a touch of extra sweetness.
Directions & Preparation
Step 1: Preheat your oven to 350°F (175°C).
Preheating the oven ensures that the cookies bake evenly and at the right temperature from the start. This is crucial for achieving the proper rise and texture. If the oven isn't preheated, the cookies could spread too much, leading to a flat and less appealing appearance.
Step 2: In a mixing bowl, combine the gluten-free flour, baking powder, baking soda, and salt.
Mixing the dry ingredients together first allows for even distribution of the leavening agents and salt throughout the flour. This step prevents any pockets of baking powder or salt from forming in the dough, ensuring that every bite is balanced and flavors are well incorporated.
Step 3: In a separate bowl, cream the softened butter and granulated sugar until light and fluffy.
Creaming butter with sugar incorporates air into the mixture, which helps to leaven the cookies. This process creates a lighter texture and allows the cookies to rise properly. Make sure to beat the mixture for about 3-5 minutes until it's pale and fluffy.
Step 4: Add the egg, lemon juice, and lemon zest to the butter and sugar mixture, mixing well until fully combined.
Integrating the wet ingredients with the creamed butter and sugar helps to develop a cohesive dough. The egg binds the mixture, while the lemon juice and zest infuse a fresh, bold flavor. Make sure to mix until no streaks remain.
Step 5: Gradually add the dry ingredient mixture to the wet ingredients, mixing until just combined.
Combining the wet and dry ingredients creates the cookie dough. It’s important not to overmix at this stage as it can lead to denser cookies. Stop mixing as soon as there are no dry ingredients visible, ensuring a tender texture.
Step 6: Chill the dough in the refrigerator for at least 30 minutes.
Chilling the dough solidifies the fat, which decreases spreading during baking. This step is especially important for gluten-free cookies that might spread more than traditional ones, helping them maintain their shape and enhance the crinkle appearance.
Step 7: Scoop tablespoon-sized balls of dough, roll them in powdered sugar, and place them on a lined baking sheet.
Rolling the cookie dough in powdered sugar creates the signature crinkle effect as they bake. The sugar coating also contributes a slight sweetness that balances the zesty lemon flavor. Ensure the balls are spaced adequately to allow for spreading.
Step 8: Bake in the preheated oven for 10-12 minutes, or until the edges are set but the centers are still soft.
Baking for the right time ensures that the cookies achieve a soft, chewy center while the edges remain crisp. Keep an eye on them as they bake to prevent overcooking; ideally, they should be just lightly golden around the edges.
Step 9: Allow the cookies to cool on the baking sheet for 5 minutes before transferring them to a wire rack.
Allowing cookies to cool briefly on the baking sheet enables them to firm up slightly before handling. This step prevents breakage when moving them to a wire rack for full cooling, ensuring they maintain their shape.
Step 10: Enjoy your cookies once fully cooled, or store them in an airtight container.
Letting the cookies cool completely allows their texture to set perfectly, ensuring every bite is delightful. When stored correctly in an airtight container, the cookies will stay fresh and chewy for several days.

The Magic of Chilling Cookie Dough
Chilling cookie dough is not just a recommendation; it's a crucial step in the baking process that impacts the overall result of your cookies. When chilled, the fat within the dough solidifies, which minimizes spreading during baking. Cold dough leads to thicker, chewier cookies with a delightful texture, preventing them from taking on a flat appearance that often comes from room temperature dough. This simple step enhances both the look and feel of your cookies.
Zesty Variations to Explore
While lemon is the star of these crinkle cookies, you can easily inject additional flavors to customize the recipe to your liking. Consider adding some poppy seeds for a delightful crunch or even substituting lime zest for an exciting twist. A blend of citrus, with a touch of orange zest, can also elevate the flavor profile, guiding it toward a refreshing summery vibe. Experimenting with flavors can produce a unique cookie that reflects your tastes!
Baking with Confidence
Baking gluten-free can be a daunting experience for some, often leading to questions and uncertainty. However, with each batch of cookies baked, you'll grow in confidence and skill. It's important to remember that gluten-free doesn't mean flavor-free; these lemon crinkle cookies are a perfect example of how delicious gluten-free treats can be. With practice, you'll learn to adjust textures and flavors, refining your baking experience with each delightful batch.
FAQs
What can I use if I don’t have gluten-free flour?
If gluten-free flour is unavailable, try using almond flour paired with a gluten-free starch, such as tapioca or cornstarch, to replicate the structure.
Why did my cookies come out too crumbly?
If the cookies are too crumbly, it may indicate insufficient moisture. Ensure you measure the flour correctly, and consider adding a touch more butter or egg.
Can I use lemon extract instead of fresh lemon juice?
Yes, you can use lemon extract as a substitute; however, start with half the amount and adjust to taste, as extracts are concentrated.
Why are my cookies flat instead of crinkled?
Flat cookies can result from too much butter or not enough chilling time. Ensure the dough is chilled adequately, which helps maintain shape during baking.
How can I enhance the lemon flavor?
To amplify the lemon flavor, increase the amount of lemon zest or juice, but be cautious not to add too much liquid, as it could affect the dough consistency.
What should I do if the dough seems too sticky?
If the dough is too sticky, consider chilling it for longer, or adding a bit more gluten-free flour gradually until it reaches the desired consistency.
Conclusion
These gluten-free lemon crinkle cookies embody a delightful blend of flavor and texture, making them a sweet indulgence for all. With their zesty freshness and appealing crinkle, they are sure to become a new favorite in your baking repertoire.
Remember, baking is both a science and an art. Each batch will teach you something new, leading to improvements and personal touches that make it uniquely yours. Enjoy sharing these cookies with friends and family—they’re bound to impress!
Recipe Card
Delightful Gluten Free Lemon Crinkle Cookies
Ingredients
Method
- Preheat your oven to 350°F (175°C).
- In a mixing bowl, combine the gluten-free flour, baking powder, baking soda, and salt.
- In a separate bowl, cream the softened butter and granulated sugar until light and fluffy.
- Add the egg, lemon juice, and lemon zest to the butter and sugar mixture, mixing well until fully combined.
- Gradually add the dry ingredient mixture to the wet ingredients, mixing until just combined.
- Chill the dough in the refrigerator for at least 30 minutes.
- Scoop tablespoon-sized balls of dough, roll them in powdered sugar, and place them on a lined baking sheet.
- Bake in the preheated oven for 10-12 minutes, or until the edges are set but the centers are still soft.
- Allow the cookies to cool on the baking sheet for 5 minutes before transferring them to a wire rack.
- Enjoy your cookies once fully cooled, or store them in an airtight container.
Notes
Additional serving suggestions: pair with a crisp salad, garlic bread, or roasted seasonal vegetables for balance.
For make-ahead, prep components separately and assemble just before heating to preserve texture.
Taste and adjust with acid (lemon/vinegar) and salt right at the end to wake up flavors.


