Introduction
Red velvet crinkle cookies bring a delightful twist to traditional cookie recipes, combining the rich flavor of cocoa with the striking allure of red food coloring. These cookies not only impress with their eye-catching appearance but also deliver a melt-in-your-mouth texture that is sure to please any palate.
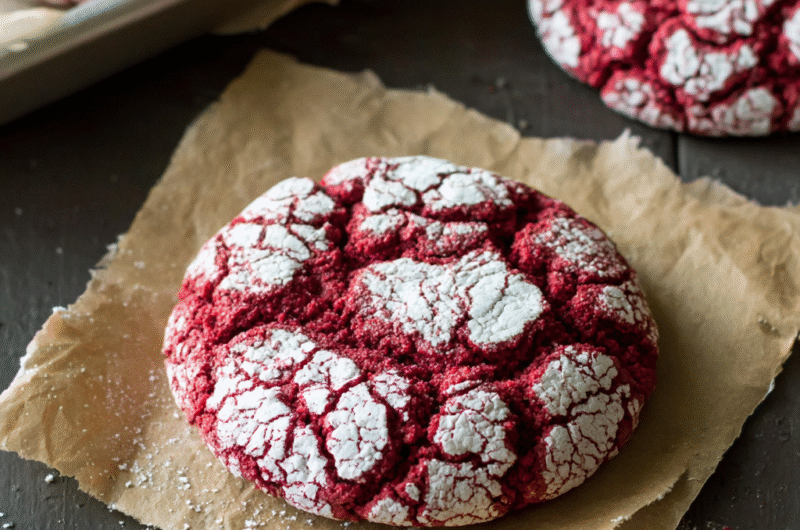
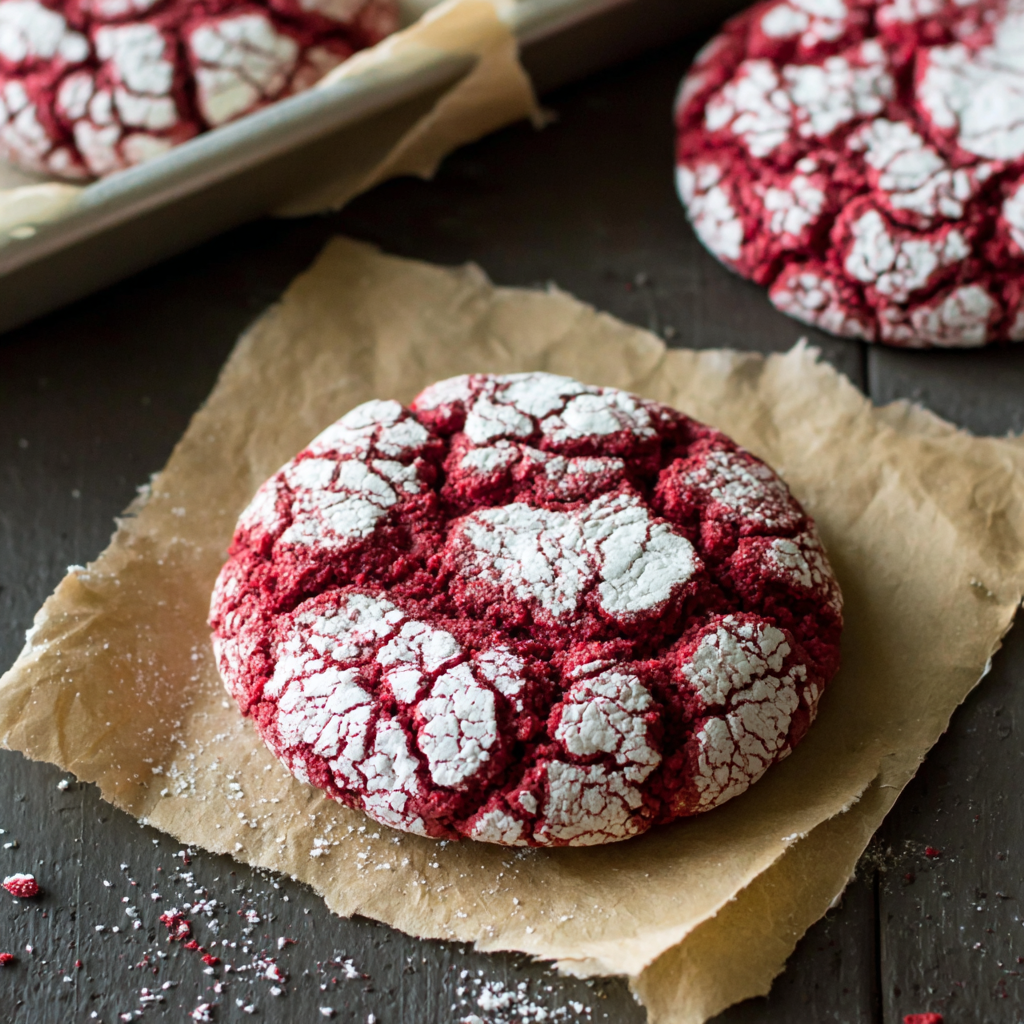
The crinkle effect on the surface, enhanced by a generous dusting of powdered sugar, adds a touch of elegance, making them a perfect treat for special occasions or a comforting dessert after dinner. Let's delve into the ingredients and steps that elevate this classic treat to new heights.
Ingredients
- 2 cups all-purpose flour
The foundation of any cookie, all-purpose flour provides structure and stability. It holds the other ingredients together, creating the proper texture that allows these cookies to stand up while still being soft and chewy. - 1/2 cup unsweetened cocoa powder
Cocoa powder contributes a rich chocolate flavor and a deeper color to the red velvet cookies. It complements the sweet flavors and helps develop the characteristic taste that these cookies are known for. - 1 teaspoon baking powder
Baking powder acts as a leavening agent, ensuring that the cookies rise adequately during baking. This helps achieve that soft, tender texture that is essential for crinkle cookies. - 1/2 teaspoon baking soda
Baking soda works alongside baking powder to provide lift and contributes to the cookies' unique texture. It also reacts with the acidity of the cocoa powder and any added vinegar to enhance the rise. - 1/2 teaspoon salt
A pinch of salt balances the sweetness and enhances the overall flavor profile. Salt is important in baked goods to ensure all the flavors are pronounced. - 1/2 cup unsalted butter, softened
Butter not only adds richness and flavor but also contributes to the cookies' tenderness. Creaming butter with sugar creates air pockets that help the cookies rise and stay fluffy. - 1 cup granulated sugar
Sugar sweetens the cookies and, when creamed with butter, helps in creating a light and airy texture. It also contributes to the crinkled appearance by melting into the dough as the cookies bake. - 1/4 cup brown sugar
Brown sugar adds moisture and a slight caramel flavor, which complements the cocoa in these cookies. Its acidity also reacts with baking soda, aiding in leavening. - 1 large egg
Eggs bind the ingredients together while also adding moisture, richness, and a bit of lift. The emulsification process helps create a consistent dough. - 1 teaspoon vanilla extract
Vanilla contributes depth of flavor, enhancing the sweetness of the cookies while harmonizing the taste of chocolate and sugar. - 1 tablespoon red food coloring
This iconic ingredient gives the cookies their signature red hue. The amount used can be adjusted for a more subtle or vibrant color, but it is essential for achieving the traditional red velvet look. - Powdered sugar, for dusting
Coating the cookies in powdered sugar before baking creates the signature crinkled appearance. It also adds a touch of sweetness and elegance to the finished cookies.
Directions & Preparation
Step 1: Preheat your oven to 350°F (175°C).
Preheating the oven is crucial for proper baking and helps cookies to rise and set correctly. At the right temperature, your cookies will bake evenly, ensuring they achieve a soft interior and a crinkled exterior without burning.
Step 2: In a medium bowl, whisk together the flour, cocoa powder, baking powder, baking soda, and salt.
Whisking these dry ingredients ensures they are well combined and allows for even distribution of leavening agents, which is vital for consistent texture and taste as they will interact with the wet ingredients in a uniform manner.
Step 3: In a large bowl, cream together the softened butter, granulated sugar, and brown sugar until light and fluffy.
Creaming the butter and sugars helps incorporate air into the mix, crucial for achieving a light texture. This process also dissolves the sugars, promoting a smoother cookie base.
Step 4: Add the egg, vanilla extract, and red food coloring to the butter-sugar mixture, and beat until fully incorporated.
Incorporating eggs and wet ingredients ensures that the mixture is uniform, allowing for consistent baking. The red food coloring should be mixed thoroughly for an even hue throughout the dough.
Step 5: Gradually add the dry ingredients to the wet mixture, mixing until just combined.
Mixing until just combined prevents over-developing the gluten, which can lead to tougher cookies. It’s important to stop mixing as soon as you can no longer see streaks of flour.
Step 6: Cover the dough with plastic wrap and refrigerate for about 30 minutes.
Chilling the dough firms it up, making it easier to shape. This step prevents the cookies from spreading too much in the oven, helping maintain their shape and enhance the crinkle effect.
Step 7: Scoop tablespoon-sized amounts of dough and roll them into balls.
Rolling the dough into even balls ensures that the cookies bake evenly. This also encourages the even coating of powdered sugar, which contributes to their final appearance.
Step 8: Roll each dough ball in powdered sugar and place them on a baking sheet lined with parchment paper.
Rolling in powdered sugar not only creates the signature crinkle effect but also adds a sweetness that complements the cocoa flavor. Make sure to leave enough space between each cookie for them to spread.
Step 9: Bake in the preheated oven for 10–12 minutes, until the edges are set but the centers are still soft.
This baking time ensures that the cookies have crispy edges while remaining soft in the center. Overbaking can lead to dry cookies, so watch for the subtle changes in appearance and texture.
Step 10: Allow the cookies to cool on the baking sheet for 5 minutes before transferring them to a wire rack.
Allowing the cookies to cool slightly on the baking sheet helps them set before moving them to a wire rack. This step prevents them from breaking apart, as they are still soft after baking.
Step 11: Enjoy your deliciously soft red velvet crinkle cookies!
Before diving in, this final step allows any residual heat to complete the softening process. Appreciate the aromas and delightful appearance of your cookies, which are sure to be a hit with anyone who tries them.

The Science Behind the Red Velvet Color
The striking red color of red velvet cookies is a result of the reaction between cocoa powder and acid, typically from vinegar or buttermilk. This classic recipe leverages food coloring to amplify the hue, ensuring a vibrant appearance. The combination not only creates visual appeal but also adds depth to the flavor, elevating these cookies beyond the ordinary.
Achieving the Perfect Crinkle Effect
The crinkled surface on these cookies is a characteristic feature that comes from rolling them in powdered sugar before baking. As the cookies spread, the sugar coating creates fissures, leading to the iconic crinkle. This textural contrast between the crisp exterior and soft interior is a hallmark of a successful crinkle cookie, making the process of dusting essential.
Variations to Elevate Your Crinkle Cookies
While traditional red velvet crinkle cookies are delectable on their own, variations exist to excite your palate further. Experimenting with different types of chocolate, flavored extracts, or incorporating mix-ins like white chocolate chips or walnuts can add a unique twist to the classic. These adaptations cater to diverse tastes while maintaining the signature crinkle.
FAQs
What should I do if my cookies don't crinkle?
If your cookies don't develop a crinkle, it could be due to insufficient chilling time or overmixing the dough. Ensure you chill the dough well to prevent excessive spreading.
Can I reduce the amount of sugar in the recipe?
Yes, you can slightly reduce the sugar, but be aware that this may impact the texture and overall sweetness. You might need to adjust other moisture elements accordingly.
What kind of cocoa powder should I use?
Use unsweetened cocoa powder for the best flavor. Dutch-processed cocoa can provide a milder taste and darker color, while natural cocoa has a sharper flavor.
Why did my cookies come out too hard?
If your cookies are hard, they may have been overbaked or the butter used wasn’t softened enough. Check your oven temperature, and consider reducing baking time.
Can I use less food coloring?
Absolutely! You can reduce the amount of food coloring for a subtler hue. The cookies will still taste delicious, just with a less vibrant appearance.
How do I know when my cookies are baked properly?
Look for edges that are set while the centers look slightly underbaked. They will firm up as they cool, ensuring a soft interior.
What if my dough is too sticky to handle?
If the dough is sticky, you might need to chill it longer or dust your hands with flour before rolling to make it easier to manage.
Conclusion
Making red velvet crinkle cookies is a rewarding experience that brings both beauty and flavor to your dessert table. Whether you’re preparing them for a party or a cozy night in, these cookies are sure to impress.
With the right techniques and a bit of creativity, you’ll master this delightful recipe and possibly even inspire new variations to fit your tastes. Enjoy the process and treat yourself to the delicious results!
Recipe Card
Irresistible Red Velvet Crinkle Cookies for Any Occasion
Ingredients
Method
- Preheat your oven to 350°F (175°C).
- In a medium bowl, whisk together the flour, cocoa powder, baking powder, baking soda, and salt.
- In a large bowl, cream together the softened butter, granulated sugar, and brown sugar until light and fluffy.
- Add the egg, vanilla extract, and red food coloring to the butter-sugar mixture, and beat until fully incorporated.
- Gradually add the dry ingredients to the wet mixture, mixing until just combined.
- Cover the dough with plastic wrap and refrigerate for about 30 minutes.
- Scoop tablespoon-sized amounts of dough and roll them into balls.
- Roll each dough ball in powdered sugar and place them on a baking sheet lined with parchment paper.
- Bake in the preheated oven for 10–12 minutes, until the edges are set but the centers are still soft.
- Allow the cookies to cool on the baking sheet for 5 minutes before transferring them to a wire rack.
- Enjoy your deliciously soft red velvet crinkle cookies!
Notes
Additional serving suggestions: pair with a crisp salad, garlic bread, or roasted seasonal vegetables for balance.
For make-ahead, prep components separately and assemble just before heating to preserve texture.
Taste and adjust with acid (lemon/vinegar) and salt right at the end to wake up flavors.


