
Introduction
Kitchen Sink Cookies are the ultimate treat for those who can't choose just one flavor. A delightful combination of various ingredients, these cookies embody creativity and indulgence. Whether you're baking for a special occasion or just to satisfy your sweet tooth, these cookies are sure to impress.
Unlike standard cookie recipes, Kitchen Sink Cookies welcome your pantry's leftovers—be it chocolate chips, nuts, or dried fruits. This flexibility makes them the perfect choice for an impromptu baking session, allowing you to utilize whatever you have on hand.
The beauty of these cookies lies not just in their flavor but also in their texture. With a chewy interior and a slightly crisp edge, each bite offers a wonderful contrast, making them a delightful snack at any time.
Ingredients
- 2 1/4 cups all-purpose flour
This is the base of your cookies, providing structure and stability. All-purpose flour has a moderate protein content, which results in a chewy texture when baked. - 1 teaspoon baking soda
Baking soda serves as a leavening agent, helping the cookies rise and providing a light texture. It also enhances browning, giving your cookies a beautiful golden color. - 1/2 teaspoon salt
Salt amplifies the flavors in sweet dishes, creating a balance. It also enhances the overall taste and prevents the cookies from tasting flat. - 1 cup unsalted butter, softened
Butter provides richness and flavor, while also contributing to the chewy texture. Softening the butter ensures even mixing and prevents clumping when combined with sugars. - 3/4 cup granulated sugar
Granulated sugar adds sweetness and acts as a tenderizer in the dough. It is essential for achieving the perfect balance in flavor. - 3/4 cup packed brown sugar
Brown sugar incorporates moisture, resulting in softer cookies. It also adds a rich, caramel-like flavor that enhances the overall taste. - 1 teaspoon vanilla extract
Vanilla extract deepens the flavor profile, making each bite more enjoyable. It's a classic addition that complements the sweetness of the cookies. - 2 large eggs
Eggs act as a binder, helping to hold the ingredients together. They also contribute to the cookie’s moisture and structure. - 2 cups chocolate chips
Chocolate chips add sweetness and melty texture. You can use a combination of dark, milk, or even white chocolate to create a flavor medley. - 1 cup chopped nuts (walnuts, pecans, etc.)
Nuts add crunch and depth, making the cookies more interesting. They also provide healthy fats and protein. - 1 cup dried fruit (raisins, cranberries, etc.)
Dried fruit introduces chews and additional layers of flavor. It also complements the sweetness of the chocolate. - 1 cup shredded coconut (optional)
Coconut adds a tropical twist and chewiness. Its subtle sweetness works well with the other ingredients, enhancing the overall enjoyment.
Directions & Preparation
Step 1: Preheat your oven to 375°F (190°C).
Preheating the oven is crucial as it ensures that your cookies bake evenly from the moment they go in. Starting with a hot oven helps achieve that desired crisp edge.
Step 2: In a bowl, whisk together the flour, baking soda, and salt.
Mixing these dry ingredients together aids in even distribution of the leavening agent and salt, preventing any clumps. This preparation step contributes to consistent texture in your cookies.
Step 3: In a separate large bowl, cream the softened butter, granulated sugar, and brown sugar until light and fluffy.
Creaming incorporates air into the butter, leading to a lighter texture in the cookies. Ensure that the mixture is fluffy before proceeding; this indicates that enough air has been incorporated.
Step 4: Add the eggs and vanilla extract to the butter mixture, mixing until well combined.
Incorporating eggs adds moisture and helps bind the dry ingredients. Be sure to mix thoroughly to create a homogeneous batter, ensuring the flavors meld and combine well.
Step 5: Gradually add the dry ingredients to the wet mixture, mixing just until combined.
Overmixing can develop the gluten in the flour, leading to tougher cookies. Stop mixing as soon as you see no dry flour; a few lumps are perfectly fine.
Step 6: Fold in chocolate chips, nuts, dried fruit, and shredded coconut (if using).
Folding ensures that the mix-ins are evenly distributed without overworking the dough. The variety in textures and flavors will make every bite exciting.
Step 7: Drop rounded tablespoons of dough onto a baking sheet lined with parchment paper.
Spacing the dough balls evenly on the baking sheet prevents them from merging while baking. Use a cookie scoop or your hands to ensure uniform cookie sizes for even baking.
Step 8: Bake in the preheated oven for 10-12 minutes or until the edges are golden.
Baking until the edges are golden but the centers still appear slightly soft ensures a chewy texture. Cookies will continue to cook on the baking sheet even after removing from the oven.
Step 9: Let the cookies cool on the baking sheet for 5 minutes before transferring to wire racks.
Cooling the cookies on the baking sheet allows them to set and makes for easier transfer. They will continue to firm up as they cool down, preserving their shape.

Embrace Your Creative Side with Mix-Ins
Kitchen Sink Cookies shine in their versatility. The concept allows for endless variations in mix-ins according to personal preferences and pantry leftovers. Have fun experimenting! Swap out chocolate chips for candies, or introduce spices like cinnamon for a warm twist. The only limit is your imagination and the ingredients available.
Perfect for Any Occasion
Whether you're hosting a gathering, surprising a friend, or indulging in a weekend treat, these cookies make a perfect addition to any event. Their appealing presence and mix of flavors can satisfy everyone from adults to kids. Plus, offering a cookie platter featuring different varieties of Kitchen Sink Cookies always sparks conversation and delight.
Storing Your Kitchen Sink Cookies
These cookies store remarkably well, maintaining their chewy texture if kept properly. Store them in an airtight container at room temperature for up to a week, or in the refrigerator for added freshness. If you prefer a softer texture, simply microwave them for a few seconds before enjoying.
FAQs
What if my cookie dough is too thick?
If your dough feels overly thick, add a tablespoon of milk at a time until the desired consistency is reached. Be careful not to add too much at once.
Can I scale this recipe down for fewer cookies?
Absolutely! Simply halve the ingredient quantities to yield about a dozen cookies. Adjust baking time as needed depending on cookie size.
What should I do if my cookies spread too much while baking?
If the cookies spread excessively, it could be due to warm butter. Ensure butter is softened but not melted, and chill the dough for 30 minutes before baking.
Can I use whole wheat flour instead of all-purpose flour?
Yes, whole wheat flour can be used, but the texture may be denser. You might need slightly less flour due to its absorbency, so adjust accordingly.
How can I make these cookies more exciting?
Try adding spices like cinnamon or nutmeg to the dough for an added warmth. You can also experiment with different chocolate varieties for various flavor profiles.
What if my cookies turn out dry?
If your cookies are dry, it may have been due to overbaking. Oven temperatures can vary, so start checking them a minute or two earlier to ensure a chewy center.
Conclusion
Kitchen Sink Cookies are more than just a treat; they are a testament to culinary creativity. By embracing various ingredients, you can create a cookie that reflects your tastes and preferences, allowing for fun experimentation each time you bake.
The joy of baking these cookies comes not only from their deliciousness but also from the freedom they offer in customization. Gather your ingredients, get baking, and prepare to enjoy a delightful cookie that everyone will crave.
Recipe Card
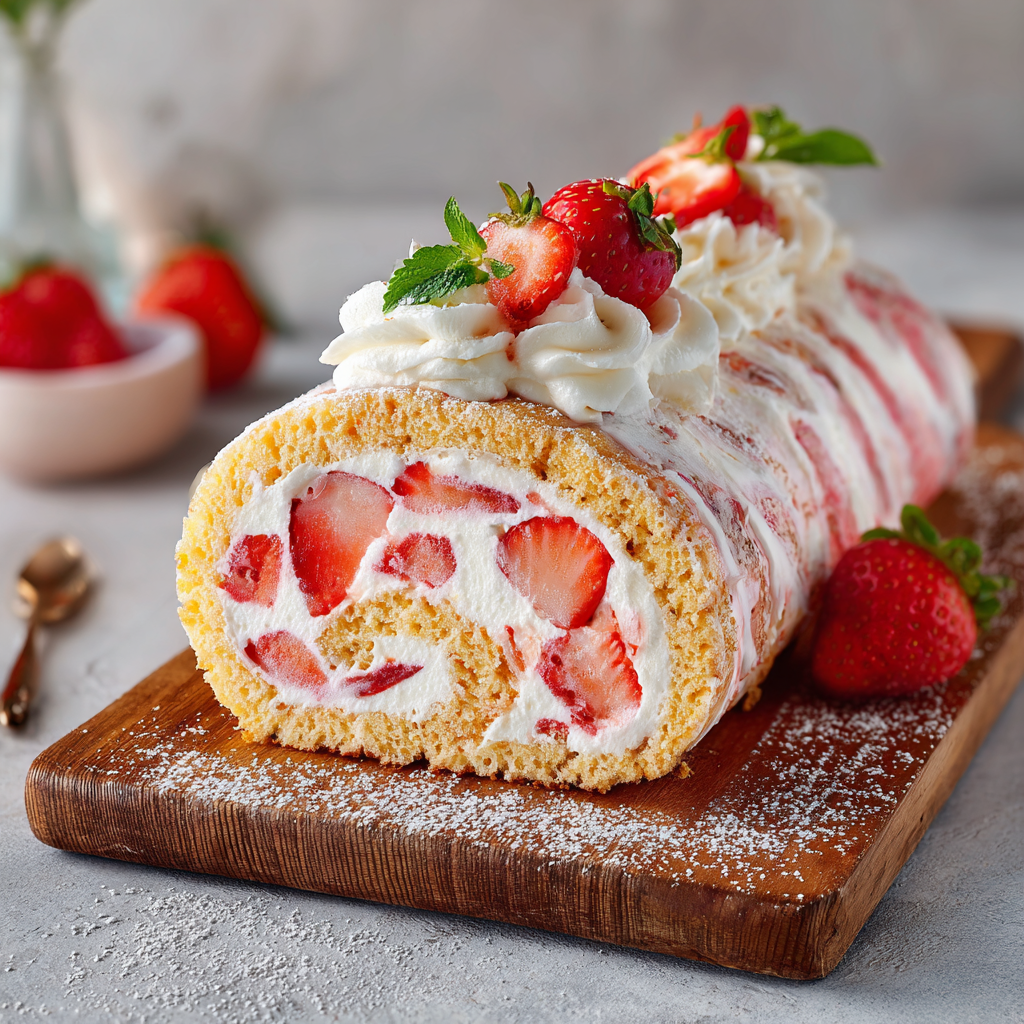
Light and Delicious Strawberry Cake Roll Recipe
Ingredients
Method
- Preheat your oven to 350°F (175°C) and line a 15x10-inch jelly roll pan with parchment paper.
- In a large bowl, beat the eggs and granulated sugar together until the mixture is thick and pale, about 5 minutes.
- Add the vanilla extract, flour, baking powder, and salt to the egg mixture, folding until just combined.
- Gradually mix in the milk until the batter is smooth and well combined.
- Pour the batter into the prepared pan, spreading it evenly to create a uniform thickness.
- Bake for 12-15 minutes or until the cake springs back when gently pressed.
- Remove the cake from the oven and immediately turn it out onto a clean kitchen towel dusted with powdered sugar.
- Carefully peel off the parchment paper and roll the cake up in the towel, starting from one short end.
- Let the rolled cake cool completely while wrapped in the towel.
- In a bowl, combine the fresh strawberry puree and gelatin, then let it sit for a few minutes.
- In another bowl, whip the heavy cream until soft peaks form, then add powdered sugar and continue whipping until stiff peaks form.
- Gently fold the strawberry mixture into the whipped cream until well combined.
- Unroll the cooled cake and spread the strawberry filling evenly over the surface, leaving a small border around the edges.
- Roll the cake back up carefully, this time without the towel, and place it seam-side down on a serving plate.
- Refrigerate the cake roll for at least 1 hour to set the filling.
- Slice and serve, garnishing with whipped cream and fresh strawberries if desired.
Notes
Additional serving suggestions: pair with a crisp salad, garlic bread, or roasted seasonal vegetables for balance.
For make-ahead, prep components separately and assemble just before heating to preserve texture.
Taste and adjust with acid (lemon/vinegar) and salt right at the end to wake up flavors.


